Mortice locks, commonly used in traditional timber doors, are set into the door itself to offer enhanced security and provide a central locking point. These locks come in two types: deadlocks and sashlocks, both of which can be operated using a traditional key or a euro cylinder.
Types of Mortice Locks
Mortice locks are typically available in two forms: deadlocks and sashlocks. A deadlock is solely operated by a key, while a sashlock also includes a spring-loaded latch that automatically catches when the door is closed. Sashlocks require a handle to operate.
How to Measure a Mortice Lock
When installing or replacing a mortice lock, it’s important to measure correctly to ensure you select the right lock for the door. A lock’s technical data sheet or fitting instructions often include a diagram to assist with routing details.
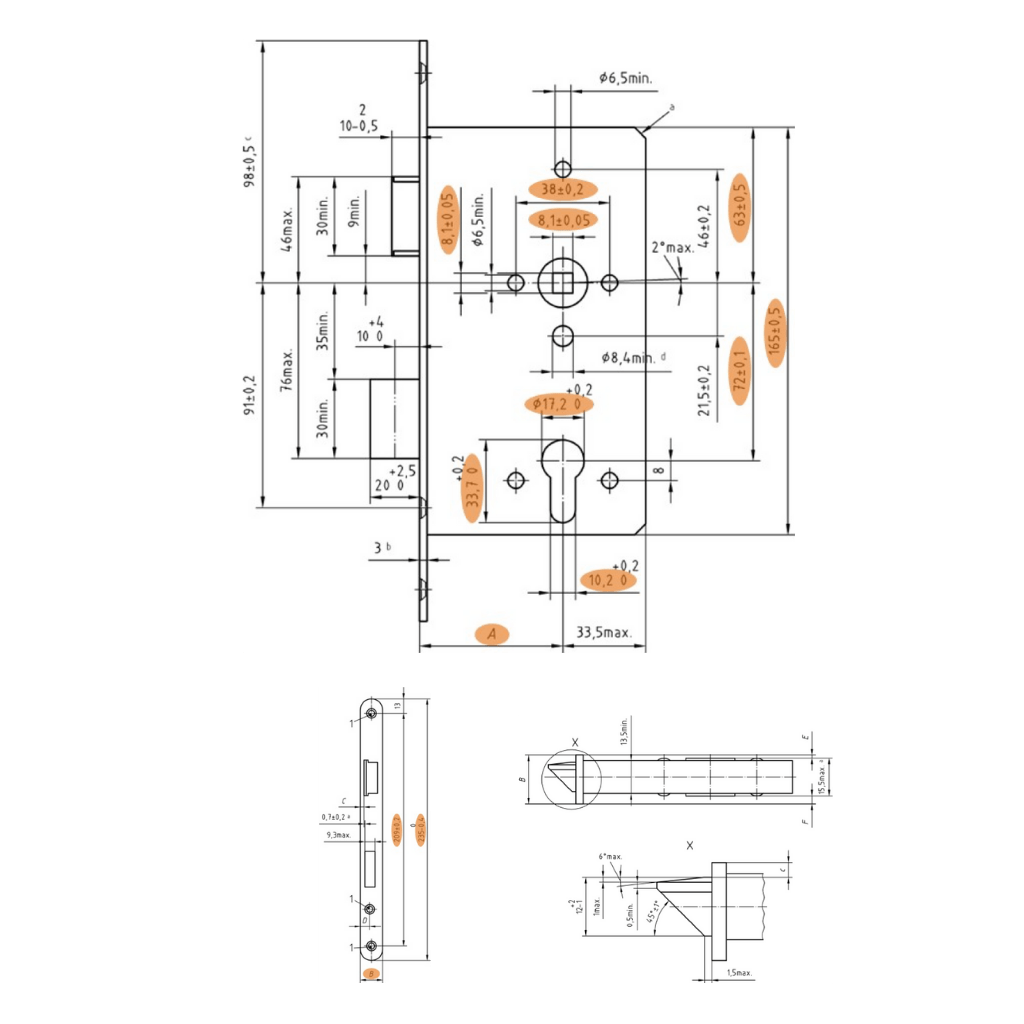
Here are the essential measurements to consider (sashlock example):
- Backset
The backset is the distance from the center of the keyhole to the edge of the door. Backsets usually measure either 44mm (for a 64mm lock) or 56mm (for a 76mm lock). A lock placed next to a glass panel typically uses a 44mm backset, while others commonly use 56mm. - C-C distance
This is the distance from the center of the keyhole/cylinder to the center of the hole for the handle spindle. This measurement is not required for deadlocks, as they don’t have a handle. - Dimension C: Case Depth
The depth of the lock case when installed in the door, measured from edge to edge. In the UK, typical case depths are 64mm (2½”) or 76mm (3”), but be sure to check if replacing an old lock. - Dimension D: Case Height
The height of the lock case, measured from top to bottom. - Dimension E: Forend (Faceplate) Length
The total length of the forend/faceplate, the part that’s visible after installation. The end of the faceplate may be square or rounded. - Dimension F: Forend (Faceplate) Width
The width of the visible forend/faceplate. Again, the end can be square or rounded.
Removing an Existing Mortice Lock
To remove a mortice lock, first locate the screws at the top and bottom of the lock on the door’s locking face. Unscrew these to detach the lock and the forend plate. If you are removing a sashlock, you’ll also need to take off the handle.
Reversing the Latchbolt (If Needed)
Many sashlocks are non-handed, meaning they can be installed on doors that swing either left or right. Depending on the door’s handing, you may need to reverse the position of the sashbolt or latch.
To do this for SDH mortice locks, follow these steps:
- Use pliers to pull the latch bolt out of the forend, rotate the bolt head 180°, or use a screwdriver to lever it clear and rotate.

Installing a Mortice Lock
Before fitting a new mortice lock, ensure it’s the right type and size for your door. If replacing an old lock, check that the dimensions match to avoid extra routing or drilling.
Tools you’ll need:
- Drill and drill bits (check the fitting instructions for correct size)
- Chisel
- Pencil, tape measure, and square
- Posidriv screwdriver
- Mallet
Note: While these steps are for sashlocks, the process is similar for deadlocks. It’s a good idea to drill pilot holes before installing fixing screws, especially in hardwood doors.
- Positioning the Lock:
Place the lock at an appropriate height on the door. Mark the top and bottom edges of the lock on the door’s edge, avoiding any door frame joints. - Measuring and Drilling:
Draw a vertical line between the two marks and drill a series of overlapping holes along this line to match the lock’s depth. Use tape on your drill bit to mark the correct depth. - Chiseling the Mortice:
Chisel out a rectangular recess to accommodate the lock body. - Fitting the Lock:
Insert the lock into the door and trace the forend’s outline. Remove the lock and chisel the recess for the forend faceplate. - Securing the Lock:
Once the lock fits snugly, position the faceplate and secure the lock with screws. If installing a sashlock, verify the door’s handing and ensure the latch bolt faces the correct direction. If necessary, reverse the bolt. - Drilling for the Keyhole:
Mark and drill the hole for the keyhole and spindle on both sides of the door, ensuring the key and spindle fit smoothly. - Final Steps:
Fit the lock into place and secure the faceplate. Insert the escutcheon and/or door handles, and - check that the lock operates smoothly.

Fitting the Box Keep/Striker
With the door open and the lock engaged, gently close it against the frame.
Mark where the latch and bolt meet the door frame.
Drill a series of overlapping holes along the vertical line.
Chisel the recess so the box striker sits flush.
Secure the striker with screws.
Maintenance
To maintain smooth operation, lubricate exposed moving parts with non-acidic mineral oil (such as “3-in-1”) twice a year. Clean the surfaces with a damp cloth and periodically tighten any loose fixings.
Lock Terminology
Sashlock: A lock with both a latch and deadbolt, typically used with a lever handle.Deadlock: A lock with just a deadbolt.
Latch: A component that secures the door when it engages with the strike plate.
Deadbolt: A bolt that can be locked and unlocked with a key, handle, or thumbturn.
Forend (Faceplate): The visible plate of the lock that attaches to the door.
Spindle: The bar that connects the handle to the lock mechanism, typically 8mm wide.
Centres: The vertical distance between the spindle and the keyhole center.
Rebate: A recess in the door frame to accommodate the door edge.
Backset: The distance from the keyhole to the edge of the lock.
Keeps/Striker: The part of the lock system that engages with the bolt to secure the door.