
How to Install Concealed Door Hinges? Installation Guide
A concealed hinge can look simple, but I often see uneven gaps, loose fixing, and poor closing when the first check is skipped1.
I install concealed door hinges by confirming the hinge model, door thickness, door weight, frame structure, opening direction, routing template, and screw type first. Then I fix the door-side part, hang the door, fix the frame-side part, and use hex-key adjustment only for final alignment.

I write this guide from the view of a concealed door hinge manufacturer. I do not treat installation as only a site job. I treat it as a product matching and assembly process. When I answer customer questions, I always start from the drawing, the hinge model, and the actual door and frame. If these items match, the final installation becomes much easier. If they do not match, adjustment cannot save the project.
What Should I Confirm Before Installing Concealed Door Hinges?
A wrong hinge choice creates trouble before the first screw is fixed. I see this problem often in batch door production.
I confirm door thickness, door weight, frame type, hinge model, opening direction, load rating, screw type, and the product drawing before installation. I also check whether the routed door and frame openings match the actual concealed hinge model.

I start with product matching, not with drilling
I always tell door factories that concealed hinge installation begins before assembly. The hinge must first match the door and frame. Different concealed hinge models have different body sizes, arm structures, load ratings, and adjustment ranges2. I do not give one universal mortise size because that can lead to wrong routing. I always ask the customer to follow the specific product drawing or routing template for the selected model.
| Check item | What I confirm | Why I confirm it |
|---|---|---|
| Door thickness | I match it with the hinge model range | The hinge body must sit correctly inside the door |
| Door weight | I compare it with hinge load rating | The door must not sag after use |
| Frame structure | I check steel, wood, aluminum, or composite frame | Screw fixing and routing method can change |
| Opening direction | I confirm left or right opening | The hinge arm and cover plate must align |
| Screw type | I check screw size and material | The fixing strength must be stable |
| Drawing/template | I compare it with prepared openings | The mortise must fit the actual hinge |
I also check the number of hinges per door. A heavier or taller door may need more hinges3. I do not use adjustment to solve a load problem. I use the correct hinge model and quantity first. For B2B buyers, this step reduces after-sales complaints. For door factories, this step reduces rework on the production line.
How Do I Prepare the Door and Frame Openings Correctly?
A clean hinge can still fail if the mortise is wrong. I have seen good hinges blamed for poor routing.
I prepare the door and frame openings by using the correct drawing or routing template for the selected hinge model. I check depth, width, center position, screw hole position, and flush seating before assembly.

I treat mortise accuracy as the base of the whole installation
I do not install the hinge first and hope adjustment will solve everything later. I check the routed openings first. The hinge body must sit flat and flush4. The door-side part and frame-side part must not twist when the screws are tightened. If the mortise is too shallow, the hinge may stand proud. If the mortise is too deep, the hinge may sit low and create an uneven door gap. If the center line is wrong, the door may rub the frame.
| Mortise point | My check method | Possible problem if wrong |
|---|---|---|
| Depth | I place the hinge into the opening and check flushness | The hinge cover may not fit cleanly |
| Width and length | I compare with the actual hinge body | The hinge may move or jam |
| Screw hole position | I test alignment before final fixing | Screws may pull the hinge out of line |
| Edge distance | I check the door edge and frame edge | The gap may become uneven |
| Surface flatness | I check whether the hinge rocks | The hinge may loosen after cycles |
I also remind customers that dimensions vary by hinge model. A concealed hinge for a light interior door is not the same as a hinge for a heavier project door5. The routing must follow the actual sample or confirmed drawing. In my factory work, I prefer sample installation before mass production. A sample test can confirm whether the CNC setting, screw fixing, cover plate fit, and adjustment range are all correct.
What Is the Correct Concealed Hinge Assembly Sequence?
Many installation mistakes happen when the hinge parts are fixed in the wrong order. I prefer a clear, repeatable workflow.
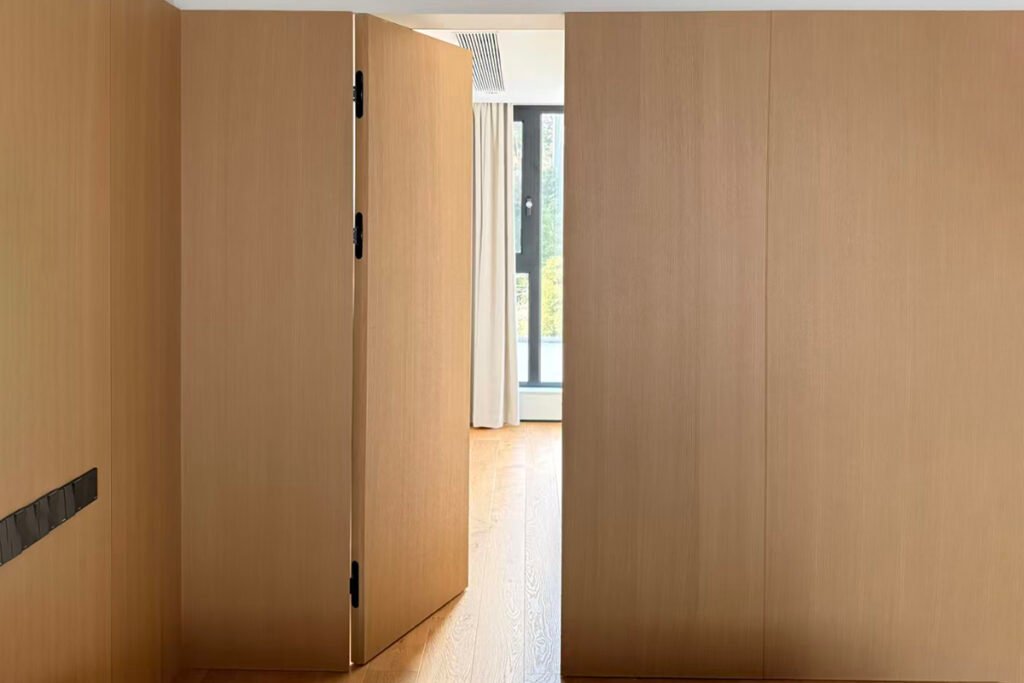
I follow this sequence: remove the cover plate, separate the hinge body, connector, and arm, fix the door-side part, place the hinge body into the prepared door opening, hang the door with upper and lower hinges, fix the frame-side part, and adjust alignment.

I use a model-specific workflow for stable assembly
I use the actual hinge model as the guide. Some concealed hinges have different connector designs6, but the basic logic is similar. I first remove the cover plate because it hides the screw positions and adjustment screws. I then separate the hinge body, connector, and arm if the model requires this step. I fix the door-side part first with the correct screws. I place the hinge body into the prepared door opening and make sure it sits flush.
| Step | Part I handle | My purpose |
|---|---|---|
| 1 | Cover plate | I remove it to access fixing and adjustment points |
| 2 | Hinge body, connector, arm | I separate them when the model design requires it |
| 3 | Door-side part | I fix it into the prepared door opening |
| 4 | Upper and lower hinges | I temporarily hang the door for positioning |
| 5 | Frame-side part | I fix it after the door position is checked |
| 6 | Adjustment screws | I fine-tune the final door gap |
I do not tighten everything blindly at the beginning. I prefer controlled fixing. I check the upper hinge and lower hinge together because the door alignment depends on both. If the door uses three hinges, I check all three positions before final tightening. I also check whether the arm moves freely and whether the connector is seated correctly. If the hinge binds during movement, I stop and check the mortise and screw position before adjustment.
How Do I Adjust Concealed Door Hinges After Installation?
Adjustment is useful, but it has limits7. I do not use it to cover a wrong opening or a wrong hinge model.
I adjust concealed door hinges in three directions: vertical, horizontal, and depth. I use a hex key, loosen the relevant adjustment screw about one turn, correct the door position, and tighten the screw again after the gap is even.

I use adjustment only for final fine-tuning
I look at the door gap first. I check the top gap, side gap, and closing face. I then decide which direction needs adjustment. Vertical adjustment moves the door up or down8. Horizontal adjustment moves the door left or right. Depth adjustment moves the door closer to or farther from the frame face. I use a hex key for these adjustments, but I do not force the screw. I loosen the relevant adjustment screw about one turn, move the door to the correct position, and tighten it again.
| Adjustment type | What I change | When I use it |
|---|---|---|
| Vertical adjustment | I move the door up or down | I use it when the top or bottom gap is uneven |
| Horizontal adjustment | I move the door left or right | I use it when the side gap is too wide or too narrow |
| Depth adjustment | I move the door in or out | I use it when the door face is not flush with the frame |
I always check the hinge model manual before adjustment because screw positions vary. I also adjust slowly. A small movement can change the gap clearly9. If the door still rubs after normal adjustment, I do not keep turning the screw. I go back and check the mortise, frame squareness, hinge quantity, and door weight. Adjustment is the final step. It is not a repair method for poor preparation.
What Common Installation Problems Should I Avoid?
Most concealed hinge problems are not caused by one screw10. I usually find the cause in model selection, routing, or assembly order.
I avoid five common problems: using the wrong hinge model, routing inaccurate openings, choosing weak screws, skipping sample installation, and relying too much on final adjustment. I check these points before batch production.

I separate product problems from process problems
When a customer sends me an installation issue, I ask for photos, door thickness, door weight, hinge model, frame material, and the routing drawing. I do this because a concealed hinge works as part of a door system. If the door is too heavy for the selected hinge, the door may sag. If the screw bite is weak, the hinge may loosen. If the opening is not centered, the cover plate may not sit well. If the hinge body is forced into the mortise, the arm may not move smoothly.
| Problem I see | Likely cause | My practical check |
|---|---|---|
| Uneven door gap | Wrong mortise position or poor frame alignment | I compare the opening with the drawing |
| Door sagging | Wrong hinge load rating or too few hinges | I check door weight and hinge quantity |
| Cover plate not fitting | Hinge not flush or screw head too high | I check seating depth and screw type |
| Door rubbing frame | Poor horizontal position or frame issue | I check side clearance before adjustment |
| Loose hinge | Weak screw fixing or wrong substrate | I check screw holding strength |
I also ask factories not to start mass routing before testing one full door set. One sample door can reveal problems early11. I check the door-side part, frame-side part, hinge body, connector, arm, and cover plate on the sample. I open and close the door several times. I then check whether the adjustment range is enough. This small test can save a full batch from rework.
How Should Door Factories and Buyers Verify Concealed Hinges Before Batch Orders?
A buyer may focus on price first, but I know the real cost appears during installation and after-sales service.
I verify concealed hinges before batch orders by testing samples on the actual door and frame. I check model fit, routing size, screw fixing, cover plate appearance, load performance, adjustment range, surface finish, and certificate requirements.

I use sample installation as a purchasing checkpoint
For door factories, hardware brands, and wholesalers, I treat sample testing as part of supplier selection. A concealed hinge must look good, but it must also match the production process. I check whether the hinge can be installed with the factory’s CNC routing process. I check whether workers can follow the assembly sequence without confusion. I check whether the finish matches the lever handle, lock body, and other door hardware in the same order.
| Verification point | What I test | Why it matters for B2B buyers |
|---|---|---|
| Actual door fit | I install the hinge on the real door and frame | The product must match the final project condition |
| Routing template | I compare drawing and sample | The factory needs stable repeat production |
| Screw fixing | I test screw bite and holding strength | The hinge must stay stable after use |
| Adjustment range | I adjust vertical, horizontal, and depth directions | The installation team needs practical fine-tuning |
| Cover plate fit | I check the final appearance | The finished door must look clean |
| [Certificates | I confirm CE or fire-rated needs](https://www.cookebrothers.co.uk/latest-news/2025/05/13/hinge-markings-myths/)%%%FOOTNOTE_REF_12%%% | The product must meet market access rules |
I also review packaging, surface protection, and batch consistency. A good concealed hinge order is not only one good sample. It must remain consistent across bulk production. At SDH Hardware, I use internal product drawings, confirmed assembly steps, and customer feedback to support this process. I cannot guarantee every field condition, but I can help customers confirm the product logic before mass assembly. This is the safer way to reduce risk.
Conclusion
I install concealed hinges successfully by matching the hinge first, preparing accurate openings, following the correct assembly sequence, and using adjustment only for final alignment.
"Concealed Cabinet Door Hinges - Everything You Need to Know ...",
. A study or guide on concealed hinge installation processes highlights the importance of preparation to avoid common errors like uneven gaps and loose fixing. Evidence role: general_support; source type: education. Supports: Skipping initial checks can lead to installation issues such as uneven gaps and poor closing.. ↩"Concealed Hinges - HingeOutlet", https://www.hingeoutlet.com/collections/concealed-hinges?srsltid=AfmBOooEfCkSOP7bnyLaIwqzakTMGCXnPCmSgkMS_7KjZ482pZvycJMI. An encyclopedia entry on door hardware explains the design variations among concealed hinge models. Evidence role: definition; source type: encyclopedia. Supports: Concealed hinges differ in design features such as body size, arm structure, load rating, and adjustment range.. ↩
"Heavy-Duty Door Hinges: Durable & Strong | HardwareSource", https://www.hardwaresource.com/collections/heavy-duty-door-hinges. Industry guidelines recommend increasing hinge quantity for larger or heavier doors to maintain structural integrity. Evidence role: expert_consensus; source type: institution. Supports: Heavier or taller doors often require additional hinges to ensure stability and prevent sagging.. ↩
"Door Shims are making it worse. What am I doing wrong? - Reddit", https://www.reddit.com/r/DIY/comments/1e7vxj9/door_shims_are_making_it_worse_what_am_i_doing/. Educational resources on hinge installation emphasize the need for flush seating to avoid operational issues. Evidence role: mechanism; source type: education. Supports: Proper seating of the hinge body ensures smooth operation and prevents misalignment.. ↩
"How to Choose & Install Concealed Hinges | Cabinet Door Series ...",
. Research on door hardware categorizes concealed hinges by their load capacity and intended application. Evidence role: definition; source type: research. Supports: Concealed hinges are categorized based on door weight and application, with distinct designs for light and heavy doors.. ↩"Hinge Connector Specifier Guide - Simpson Strong-Tie", https://www.strongtie.com/products/connectors/wood-construction-connectors/technical-notes/hinge-connector-specifier-guide. Educational materials on hinge design describe the functional differences in connector designs among concealed hinge models. Evidence role: definition; source type: education. Supports: Connector designs in concealed hinges vary by model and influence installation and adjustment processes.. ↩
"Can these poorly installed cabinets be fixed? - Facebook", https://www.facebook.com/groups/woodworkingforbeginner/posts/2885342008287072/. Educational guides on hinge adjustment explain its role in alignment and its limitations in addressing installation mistakes. Evidence role: mechanism; source type: education. Supports: Adjustment can fine-tune door alignment but cannot correct fundamental installation errors.. ↩
"How do I adjust the height on a concealed door hinge? - Reddit", https://www.reddit.com/r/Carpentry/comments/1p4kmbe/how_do_i_adjust_the_height_on_a_concealed_door/. Educational resources on hinge adjustment detail the mechanisms for vertical movement in concealed hinges. Evidence role: mechanism; source type: education. Supports: Vertical adjustment in concealed hinges is achieved by loosening and tightening specific screws to move the door up or down.. ↩
"Cabinet door hinge tips — perfect alignment for double ... - Instagram", https://www.instagram.com/reel/DWCDUodE-aA/?hl=en. Research on hinge adjustment mechanisms highlights the precision required for effective door gap alignment. Evidence role: mechanism; source type: research. Supports: Small adjustments in concealed hinges can have a noticeable impact on door alignment and gap consistency.. ↩
"Common Door Hinge Issues and How to Fix Them - HardwareSource", https://www.hardwaresource.com/a/blog/post/common-door-hinge-issues-and-how-to-fix-them. Educational materials on hinge installation emphasize the importance of holistic preparation to avoid common issues. Evidence role: expert_consensus; source type: education. Supports: Concealed hinge problems often stem from systemic issues like incorrect model selection or poor routing rather than isolated screw errors.. ↩
"Blower Door Tests - Department of Energy", https://www.energy.gov/energysaver/blower-door-tests. Case studies in door manufacturing highlight the role of sample testing in preventing large-scale installation mistakes. Evidence role: case_reference; source type: education. Supports: Sample testing of doors can identify concealed hinge installation issues early, reducing the risk of batch production errors.. ↩
"Hinge Markings: 8 Common Myths Debunked", https://www.cookebrothers.co.uk/latest-news/2025/05/13/hinge-markings-myths/. Government and industry standards outline certification requirements for concealed hinges, including CE marking and fire-rating. Evidence role: definition; source type: government. Supports: Concealed hinges often require certifications such as CE marking or fire-rating to meet regulatory and market standards.. ↩
