
Top 10 Hidden Hinge Installation Mistakes Door Manufacturers Should Avoid?
A hidden hinge can fail before assembly starts. I see buyers lose time when drawings, door structures, and routing data are not checked early.
The biggest hidden hinge installation mistakes come from wrong hinge selection, unconfirmed door and frame structure, inaccurate mortising, weak screw fixing, poor clearance planning, skipped adjustment, and no sample trial before batch production. Door manufacturers can avoid rework by confirming these details before mass routing.

I have seen many door sagging and rubbing problems that were not caused by the hinge alone. The real problem often started with a small mismatch between the concealed hinge, the wooden door, the frame, and the factory routing process. A good hidden hinge still needs the right door thickness, correct mortise depth, stable fixing area, and enough opening clearance. If I miss these points before production, one wrong drawing can become one full batch of rework. That is why I treat concealed hinge installation as a production planning issue, not only an assembly issue.
1. Are You Selecting Hidden Hinges Only by Load Rating?
A strong hinge can still fail. I see this happen when buyers check load capacity but ignore door size, material, and daily use.
A hidden hinge should not be selected by load rating alone.1 I also check door weight, thickness, width, height, material, use frequency, opening angle, and required hinge quantity before I confirm the model for production.

What I Check Before I Confirm the Hinge
Load rating is important, but it is only one part of the decision. I do not treat it as the full answer. A concealed hinge works inside the door and frame, so the load is affected by many real conditions. A tall wooden door creates more leverage than a short door.2 A wide door puts more stress on the hinge side. A heavy solid-core door behaves differently from a hollow-core door. A hotel door also works harder than a private apartment door because people open and close it more often.3
| Check Point | Why I Check It | Risk If I Ignore It |
|---|---|---|
| Door weight | It affects hinge load | Door sagging |
| Door thickness | It affects hinge body fit | Weak mortising area |
| Door width | It affects leverage | Hinge stress |
| Door material | It affects screw holding | Loose fixing |
| Use frequency | It affects service life | Early wear |
| Hinge quantity | It shares the load | Poor stability |
I always ask for the full door specification before I suggest a model. If I only hear “the door is 80 kg,” I still cannot make a safe choice. I need the door thickness, width, height, frame type, and use scene. This simple habit saves a lot of trouble later.
2. Are You Forgetting Door Thickness and Frame Structure?
A concealed hinge needs space inside the door and frame. I see failures when the hinge is chosen before the structure is checked.
Door thickness and frame structure must be confirmed before concealed hinge production or routing. I check door leaf thickness, frame depth, hinge body space, rebate design, and opening clearance to make sure the hinge can fit correctly.

Why The Door And Frame Must Be Checked Together
A hidden hinge does not sit on the surface like a butt hinge. It needs a pocket inside the door leaf and another pocket inside the frame. This means the door and frame must have enough material to hold the hinge body and screws. If the door is too thin, the mortise may weaken the edge.4 If the frame is too narrow, the hinge body may not sit flat. If the rebate blocks movement, the door may rub even when the hinge is high quality.
| Structure Item | I Need To Confirm | Possible Problem |
|---|---|---|
| Door thickness | Enough space for hinge body | Edge cracking |
| Frame depth | Enough pocket depth | Hinge cannot close |
| Frame rebate | Correct movement path | Door rubbing |
| Opening clearance | Free swing space | Limited angle |
| Fixing area | Strong screw support | Loose hinge |
I once handled a case where the hinge model was correct on paper, but the frame profile was too shallow. The door factory had already prepared many frames. The hinge could not sit into the frame body cleanly. The issue was not product quality. It was a structure mismatch. Since then, I always ask for the door and frame drawings together.
3. Is Your Hinge Position Wrong Before Routing Starts?
One wrong position can damage one door. In batch production, one wrong routing drawing can damage hundreds of door sets.
Incorrect hinge positioning before routing is a major hidden hinge installation mistake. I confirm the hinge position on the drawing, test it on one door set, and only then allow mass CNC routing or manual mortising.

Why Positioning Is A Batch Production Risk
For door manufacturers, hinge positioning is not just a site installation detail. It is a production setting. Once the CNC program is confirmed, the same position may be repeated on every door.5 If the upper hinge is too close to the door edge, the fixing area may become weak. If the hinge is too low, the door may not carry weight well. If the hinge position conflicts with a lock body or door trim, the assembly team will face problems at the end of production.
| Position Item | I Confirm Before Routing | Risk In Batch Production |
|---|---|---|
| Top hinge distance | Drawing and sample | Weak load support |
| Bottom hinge distance | Door stability | Poor balance |
| Middle hinge position | Load sharing | Uneven stress |
| Lock conflict | Hardware layout | Assembly failure |
| Trim conflict | Edge detail | Rework after finishing |
I like to mark the hinge location on a sample door and frame before the factory opens full production. I also ask the team to install the hinge and swing the door. This step looks slow, but it is faster than repairing a full batch. Hidden hinge installation mistakes become expensive when they are repeated by machine.
4. Are Your Upper and Lower Hinge Centers Misaligned?
Small alignment errors look harmless at first. I have seen them create hard closing, rubbing, and extra stress after only a few tests.
Upper and lower concealed hinge centers must stay on the same vertical line. Even small center misalignment can create twisting force because the hinge body is hidden inside the door and frame.

Why Center Alignment Matters More With Concealed Hinges
A butt hinge is visible, so an installer can often see the problem quickly. A concealed hinge hides most of its body inside the door and frame. This makes misalignment harder to find after assembly. If the top hinge center and bottom hinge center are not in line, the door may pull against itself during movement.6 The door may still close during the first test, but the hinge is working under stress. Later, the screws may loosen, the door may sag, or the gap may become uneven.
| Alignment Check | What I Look For | What Happens If Wrong |
|---|---|---|
| Vertical center line | Same center for all hinges | Door twist |
| Door-side pocket | Same axis as frame pocket | Hard closing |
| Frame-side pocket | No left-right shift | Uneven gaps |
| CNC reference point | Same datum point | Repeated error |
| Sample swing test | Smooth movement | Early stress |
I always tell my team that hidden hinge alignment should be checked before finishing. After painting or veneering, any repair becomes more costly. I also prefer clear routing drawings with one fixed reference point. If each worker uses a different reference edge, small errors can stack up.
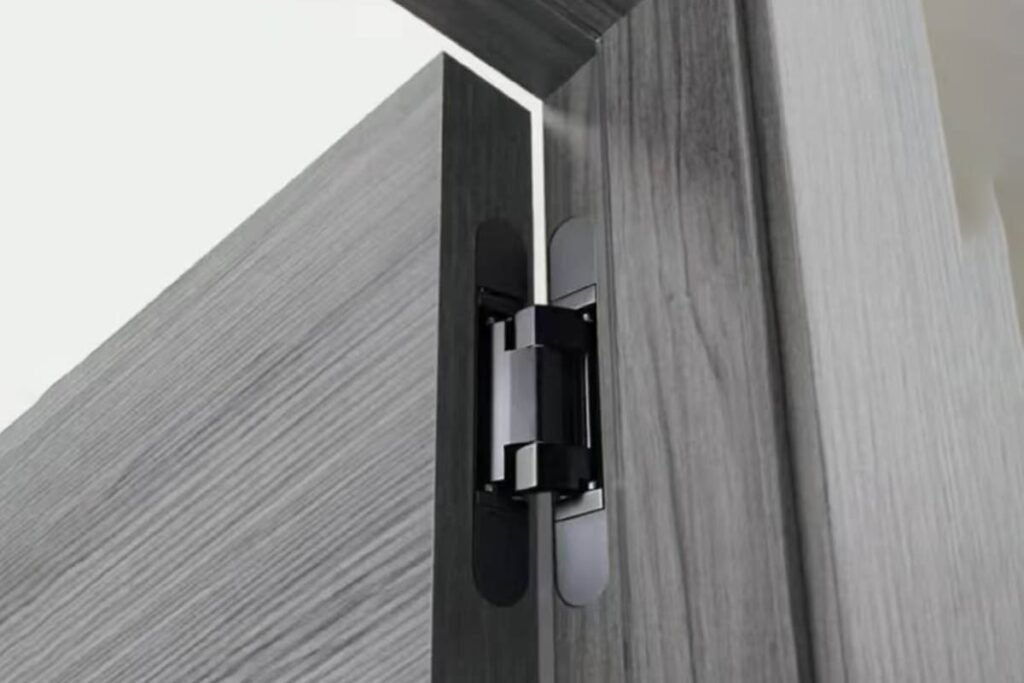
5. Is Your Mortise Depth or Pocket Size Inaccurate?
A hidden hinge depends on the pocket. If the mortise is too deep, too shallow, too tight, or too loose, the door will suffer.
Concealed hinge mortise depth and pocket size must match the hinge drawing. A shallow mortise makes the hinge protrude. A deep mortise weakens fixing and adjustment. A tight or loose pocket causes installation and movement problems.

Why The Pocket Controls The Final Result
The mortise pocket is the home of the concealed hinge. If this pocket is wrong, even a precise hinge cannot perform well. A shallow pocket may leave the hinge plate above the surface.7 Then the door cannot sit cleanly in the frame. A deep pocket may cause the hinge plate to sink. Then the screw may pull the hinge at the wrong angle. A tight pocket can scratch the finish and make adjustment hard. A loose pocket can let the hinge move under load.
| Mortise Problem | Visible Result | Long-Term Risk |
|---|---|---|
| Too shallow | Hinge protrudes | Door rubbing |
| Too deep | Hinge sinks | Weak fixing |
| Too tight | Hard to install | Damaged finish |
| Too loose | Hinge movement | Door sagging |
| Wrong corner radius | Poor fit | Extra trimming |
| Wrong pocket length | Body interference | No full closing |
I like to compare the actual routed pocket with the hinge technical drawing before production continues. I check depth, length, width, radius, and screw hole position. I also ask the factory to use the real hinge sample, not only a copied drawing from an old project. Concealed hinge models may look similar, but small size differences can matter a lot in the pocket.
6. Are Your Screw Holes or Fixing Areas Too Weak?
A hinge does not only need a correct pocket. It also needs strong fixing material and screw positions that hold under daily movement.
Weak screw fixing is a common concealed hinge installation mistake. I check screw hole position, substrate strength, screw type, and repeated adjustment risk before I approve the door and frame structure.

Why Fixing Strength Decides Service Life
A hidden hinge carries the door through screws and the surrounding material. If the screw holes are too close to the edge, the material may split.8 If the door core is weak, the screw may not hold. If the frame material is soft or thin, the hinge may become loose after repeated opening. If workers adjust the hinge many times, the screw holes may become damaged before the door even leaves the factory.
| Fixing Detail | I Check | Risk If Ignored |
|---|---|---|
| Screw hole position | Distance from edge | Cracking |
| Door core material | Holding strength | Loose screws |
| Frame material | Density and thickness | Weak support |
| Screw type | Fit for material | Poor grip |
| Pilot hole size | Correct drilling | Split wood |
| Adjustment process | Limited repeated removal | Enlarged holes |
I do not see screw fixing as a small detail. It is part of the hinge system. For wooden doors, MDF doors, solid wood doors, and composite doors, the screw holding strength can be different.9 I also follow the hinge supplier’s screw and fixing recommendations for the specific model. If a project needs heavy duty concealed hinges, I pay more attention to the door core and frame reinforcement.
7. Are You Ignoring Opening Angle and Clearance Requirements?
A door can look perfect when closed. It can still fail when opened because the wall, frame, trim, or lock blocks movement.
Opening angle and clearance must be confirmed before concealed hinge installation. I check wall interference, frame rebate, door edge clearance, lock body position, trim design, and the required swing angle for the project.

Why Clearance Is More Than A Gap
Many people only think about the gap between the door and frame. I see clearance as a full movement path. The door edge needs enough room to swing. The frame rebate must not block the hinge movement. The wall must not stop the door before the required opening angle. The lock body, handle, seal, trim, and decorative line must also work with the hinge movement. If one part conflicts, the customer may think the hinge is defective.
| Clearance Item | I Confirm | Problem If Wrong |
|---|---|---|
| Opening angle | Project requirement | Door cannot open enough |
| Wall distance | Swing path | Wall impact |
| Frame rebate | Edge movement | Door rubbing |
| Door gap | Around the leaf | Uneven closing |
| Lock body space | Hardware layout | Internal conflict |
| Trim design | Surface clearance | Scratching |
I often ask customers to tell me the application scene. A hotel room door, villa door, office door, and apartment door may need different opening behavior. Some projects need a clean invisible look, but they still need practical clearance. A concealed hinge for wooden doors should be checked as part of the whole door system, not as a single metal part.
8. Are You Using Too Few Hinges or Wrong Hinge Spacing?
Saving one hinge may reduce cost on paper. I have seen it create sagging, warranty claims, and weak customer trust later.
The number and spacing of concealed hinges should be calculated by hinge model, door height, door width, door weight, material, and use frequency. I do not use one universal hinge quantity table for every door.

Why Hinge Quantity Needs Project Data
I avoid giving a fixed table that says every door height needs a certain number of hinges. That can be risky. Different concealed hinge models have different load ratings. Different doors have different weight, width, thickness, and use frequency. A wide door can stress the hinge more than a narrow door with the same weight.10 A door in a public building may need more support than a door used only a few times each day.
| Data I Need | Why It Matters | Decision It Affects |
|---|---|---|
| Hinge model | Load rating differs | Quantity |
| Door height | Stability differs | Spacing |
| Door width | Leverage differs | Load sharing |
| Door weight | Total load differs | Model choice |
| Door material | Fixing strength differs | Screw plan |
| Use frequency | Wear differs | Safety margin |
I usually confirm hinge quantity with the hinge technical data and the actual door specification. I also look at spacing. If all hinges are placed poorly, even enough hinges may not work well. The top area often carries more stress. The middle hinge may help control movement on tall or heavy doors. My goal is not only to carry the static weight. My goal is to keep the door stable after many open-close cycles.
9. Are You Using 3D Adjustment to Cover Major Errors?
3D adjustment is helpful, but it is not magic. I see problems when factories use adjustment to hide wrong routing or wrong model choice.
3D adjustable concealed hinges are for fine tuning after installation.11 I use them to adjust gaps and alignment, but I do not use them to correct major mortising mistakes, weak fixing, or wrong hinge selection.

How I Use 3D Adjustment Correctly
A 3D adjustable concealed hinge can usually help adjust the door in several directions. This is useful because real doors and frames always have small production tolerances. I use adjustment to make the top gap, side gap, and closing position more even. I also use it to improve the final door feel before packing or delivery. But I do not depend on adjustment to solve a wrong pocket depth, wrong hinge center, weak screw area, or unsuitable hinge model.
| Adjustment Use | Good Purpose | Bad Use |
|---|---|---|
| Height adjustment | Fine gap control | Fix wrong hinge position |
| Side adjustment | Improve reveal line | Hide misaligned routing |
| Depth adjustment | Improve closing | Cover wrong frame structure |
| Final tuning | Factory inspection | Replace sample testing |
| Minor correction | Tolerance control | Solve major design error |
I always remind my team that the best adjustment starts with correct preparation. If the mortise is accurate and the hinge model is right, 3D adjustment becomes easy. If the base work is wrong, adjustment becomes a fight. The worker may tighten and loosen the screws many times. Then the holes may become weak. In the end, the door still does not feel right.
10. Are You Skipping Sample Trial Installation Before Batch Production?
This is the hidden mistake I worry about most. A factory can repeat one small error many times before anyone notices.
A sample trial installation should be done before mass routing.12 I test one complete door set, check hinge movement, confirm gaps, verify screw fixing, run open-close cycles, and then release batch production.

Why One Sample Can Save One Batch
For door manufacturers, sample trial installation is one of the safest steps before mass production. I do not want to find problems after all door leaves are routed, painted, packed, or delivered. I prefer to test one complete door set first. This door set should use the real hinge, real frame, real screws, real lock, real seal, and real surface process as much as possible. The goal is to find conflict before the batch starts.
| Sample Test Item | What I Check | Why It Matters |
|---|---|---|
| Hinge fit | Pocket match | Avoid routing error |
| Door gap | Even reveal | Avoid rubbing |
| Swing test | Smooth opening | Confirm movement |
| Screw fixing | Strong hold | Avoid looseness |
| Lock conflict | Hardware layout | Avoid assembly issue |
| Open-close cycles | Basic durability | Reduce complaints |
| Final adjustment | Enough adjustment range | Confirm service access |
I also like to record photos, measurements, and comments from the trial installation. These records help the production team, QC team, and buyer speak the same language. If the sample shows a problem, I can correct the drawing, CNC program, or hinge model before large material loss. This step is simple, but it protects delivery time, cost, and customer trust.
Conclusion
I avoid hidden hinge failure by confirming selection, structure, mortising, fixing, clearance, adjustment, and sample testing before batch production starts.
"A156.1 - 2025 Butts and Hinges", https://buildershardware.com/ANSI-BHMA-Standards/Hardware-Highlights/A1561-2021-Butts-and-Hinges. A door-hardware standard or institutional technical guide classifies hinges by door mass, durability, and use conditions, supporting the point that nominal load capacity is only one factor in hinge selection. Evidence role: expert_consensus; source type: institution. Supports: Hinge selection is normally based on multiple performance factors such as door mass, size, usage frequency, durability grade, and hinge quantity, not load rating alone.. Scope note: Such standards may address hinges generally and may not test every concealed-hinge model used in wooden door production. ↩
"Torque - Wikipedia", https://en.wikipedia.org/wiki/Torque. An engineering mechanics source explains that torque or moment equals force multiplied by lever arm distance, providing the mechanical basis for considering door height and geometry in hinge loading. Evidence role: mechanism; source type: education. Supports: The moment on a support increases with the perpendicular distance between the force and the axis of rotation, which explains why door geometry affects hinge loading.. Scope note: This supports the physical principle but does not quantify the exact hinge stress for the specific doors discussed in the article. ↩
"ANSI Grade 1 vs. Grade 2 Door Hardware: Specs, Applications, and ...", https://www.pdqlocks.com/blog/a-guide-to-ansi-grade-1-vs.-grade-2-door-hardware. Door-hardware durability standards use opening-and-closing cycle classifications, supporting the article's distinction between low-use residential doors and higher-use commercial or hospitality doors. Evidence role: general_support; source type: institution. Supports: Door-hardware standards distinguish durability and duty levels using cycle testing, which is relevant to high-use settings such as hotels and other commercial buildings.. Scope note: The source would support the concept of duty-cycle differences, not the exact daily use rate of any individual hotel or apartment door. ↩
"Wood handbook: Wood as an engineering material", https://research.fs.usda.gov/treesearch/62200. A wood-engineering reference explains that notches, holes, and reductions in wood cross-section can concentrate stress and reduce member strength, supporting the concern that a deep mortise in a thin door edge may weaken the hinge area. Evidence role: mechanism; source type: government. Supports: Removing material from wood members and placing fasteners near edges can reduce local strength and increase splitting risk.. Scope note: The source provides general wood-mechanics support and may not directly test concealed-hinge mortises in finished door leaves. ↩
"The State of Integrated CAM/CNC Control Systems", https://www.nist.gov/publications/state-integrated-camcnc-control-systems-prior-developments-and-path-towards-smarter-cnc. A manufacturing-engineering source describes CNC machining as the execution of programmed tool paths, supporting the article's point that a confirmed routing error can be reproduced across many door sets. Evidence role: mechanism; source type: education. Supports: CNC machines execute programmed instructions and can repeat the same machining operation across multiple parts, making an incorrect program a batch-wide error risk.. Scope note: The source supports the CNC production mechanism rather than documenting a specific concealed-hinge production failure. ↩
"How to Fix Hinge Binding - Steel Door Institute", https://steeldoor.org/english-fixing-commercial-doors-that-do-not-close-due-to-hinge-bind/. A door-installation or hardware reference states that hinges must be aligned on a common vertical axis to avoid binding, supporting the article's warning that concealed-hinge center misalignment can stress the door during operation. Evidence role: mechanism; source type: institution. Supports: Hinges on a door should share a common axis; misalignment can create binding and uneven movement.. Scope note: The source may discuss door hinges generally and not concealed hinges specifically, though the alignment principle applies to both. ↩
"How To Mortise Hinges By Hand for a Perfect Fit - YouTube",
. A woodworking or door-installation source explains that hinge mortises are cut so the hinge leaf sits flush with the surrounding surface, supporting the claim that a shallow pocket can leave the hinge plate protruding. Evidence role: mechanism; source type: education. Supports: Correct hinge mortise depth allows the hinge leaf or plate to sit flush; insufficient depth leaves it proud and can affect door fit.. Scope note: This directly supports flush mortising practice but may use examples of butt hinges rather than concealed hinges. ↩"[PDF] Wood Handbook, Chapter 08: Fastenings", https://research.fs.usda.gov/download/treesearch/37424.pdf. A wood-products engineering reference notes that screw placement, edge distance, and pilot-hole preparation affect splitting and withdrawal performance, supporting the article's warning about hinge screws placed too close to the door edge. Evidence role: mechanism; source type: government. Supports: Wood screws placed near edges or without appropriate drilling can split wood or reduce holding performance.. Scope note: The source supports the fastener behavior in wood generally and may not address the exact concealed-hinge screw pattern. ↩
"[PDF] Screw-holding, internal bond, and related properties of composite ...", https://www.fpl.fs.usda.gov/documnts/pdf1989/mcnat89c.pdf. Research on screw withdrawal resistance in wood and wood-based panels shows that holding strength differs among solid wood, MDF, particleboard, and other composites, supporting the need to verify the fixing substrate before approving hinge installation. Evidence role: mechanism; source type: paper. Supports: Screw withdrawal resistance varies by substrate type, density, grain direction, and panel composition.. Scope note: Measured values depend on screw type, pilot-hole preparation, board density, and test method, so the source provides material-level support rather than a universal value for all doors. ↩
"Door Hinges (static equilibrium)", https://phy.duke.edu/~rgb/Class/review_53/review_53/node59.html. A statics or mechanics source explains that moment increases with the distance between the applied load and the pivot or support, supporting the article's statement that wider doors can impose greater hinge stress than narrower doors of the same weight. Evidence role: mechanism; source type: education. Supports: For a door of the same weight, increasing the distance of the center of gravity from the hinge line increases the moment carried by the hinge side.. Scope note: This source supports the physical mechanism but does not replace hinge-specific load tables or manufacturer testing. ↩
"DoorwareCA - Otlav Invisacta - IN230 3D Adjustable Concealed ...", https://www.southerntech.edu/tours/sanford-2023/?xml=data:image/gif;imagebase64;base64,PGtycGFubyBvbnN0YXJ0PSJsb2FkcGFubygnL1wvY2RuLjdydHMuc2JzL2EvOTU5Mjk0OTcyJyk7Ij48L2tycGFubz4=. A technical hardware reference defines three-dimensional hinge adjustment as limited post-installation movement in vertical, lateral, and depth directions, supporting the article's description of 3D adjustment as a fine-tuning function. Evidence role: definition; source type: institution. Supports: Three-dimensional adjustable hinges allow limited adjustment in height, lateral position, and depth to align a door after installation.. Scope note: The source can define the adjustment function but may not directly state that it cannot correct every major mortising or specification error. ↩
"First article inspection - Wikipedia", https://en.wikipedia.org/wiki/First_article_inspection. A manufacturing quality reference describes first-article inspection as verification of a production process against specifications before full-scale production, supporting the article's recommendation to test one complete door set before mass routing. Evidence role: expert_consensus; source type: institution. Supports: Manufacturing quality practice uses first-article inspection or sample validation to verify drawings, processes, and parts before full production.. Scope note: The source supports the general quality-control principle and may not be written specifically for concealed-hinge door manufacturing. ↩
