
A misaligned concealed hinge can create rubbing, uneven gaps, and closing noise. I treat it early because small errors can become after-sales complaints.
To adjust a 3D adjustable concealed hinge, I first identify the door problem: height, side gap, or depth. Then I use the correct screws, make small changes, retighten securely, and test the door after each adjustment. Always follow the installation drawing for the exact hinge model.

I have seen many door alignment problems that were not caused by a bad hinge. They were caused by rushed adjustment. A 3D adjustable concealed hinge gives the installer three correction directions: vertical, side-to-side, and depth. This is useful for door factories, project installers, wholesalers, and hardware brands. But the hinge must still be adjusted with care. The screw names, screw positions, tool size, and turning direction can change from one hinge design to another. In this guide, I use one SDH-style 3D concealed hinge adjustment method as a practical example. I do not treat it as a universal rule for every concealed hinge. If I want a clean door gap, smooth closing, and fewer site complaints, I always adjust slowly and check the exact drawing first.
What Does 3D Adjustment Mean on a Concealed Hinge?
A concealed hinge looks simple after installation. But I know that hidden parts can cause visible problems when the door is not aligned.
3D adjustment means the hinge can correct the door in three directions: up and down, left and right, and in and out.1 I use vertical adjustment for sagging, side-to-side adjustment for uneven gaps, and depth adjustment for flush alignment with the frame.

I explain 3D adjustment to buyers and installers in a very direct way. I first look at the symptom. I do not start by turning screws at random. If the top of the door rubs the frame, I check the vertical position. If the gap is wider on the lock side or too tight near the hinge side, I check the side-to-side position. If the door face sits proud of the frame or too deep inside the frame, I check the depth. This simple method saves time because each symptom points to one main adjustment direction.
| Door symptom I see | Adjustment direction I check | Main purpose |
|---|---|---|
| Door sags or sits too low | Vertical adjustment | Move the door up or down |
| Gap is uneven near hinge or lock side | Side-to-side adjustment | Move the door left or right |
| Door is not flush with the frame | Depth adjustment | Move the door in or out |
I also remind my customers that adjustment is not a repair for every installation issue. If the mortise is cut in the wrong position, the door is too heavy for the hinge, or the screws are loose in weak material, adjustment cannot fully solve the problem.2 I use adjustment for fine alignment after correct installation. I do not use it to hide poor machining. This difference matters in batch door production because one wrong habit can repeat across many doors.
How Do I Adjust the Vertical Position?
A sagging door looks like a small problem at first. But I know it can cause rubbing, latch failure, and customer complaints later.3
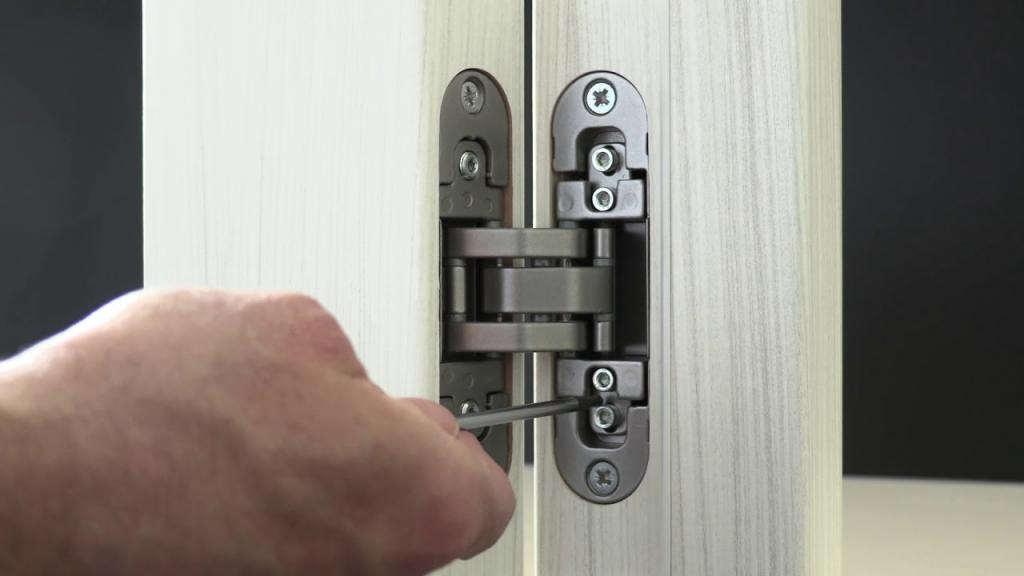
I adjust the vertical position when the door needs to move up or down. On one SDH-style model, I slightly loosen the clamping screws, turn the height adjustment screws with a 4 mm hex key, then retighten the clamping screws.4

I start vertical adjustment only after I confirm the door is supported and the hinge is correctly fixed. I use the term “clamping screws” for the screws that hold the hinge adjustment position on this model. I do not treat them as the same as “fixing screws,” because fixing screws usually secure the hinge body to the door or frame. The exact terms must follow the product manual. On this SDH-style example, I use a 4 mm hex key. I slightly loosen the clamping screws first. I do not remove them. Then I turn the lower height adjustment screw to move the door vertically. If the hinge design requires balance, I turn the upper height adjustment screw in the opposite direction. After that, I retighten the clamping screws securely and test the door.
| Step I follow | Action | Why I do it |
|---|---|---|
| 1 | I check rubbing and gap height | I confirm vertical adjustment is needed |
| 2 | I slightly loosen clamping screws | I allow controlled movement |
| 3 | I turn the lower height screw | I move the door up or down |
| 4 | I adjust the upper height screw if needed | I balance the hinge position |
| 5 | I retighten clamping screws | I lock the setting |
| 6 | I open and close the door | I confirm smooth movement |
I always adjust in small steps. I have seen installers over-turn the screw because they want a fast result. That creates a new gap problem. I prefer a small turn, then a test, then another small turn if needed. If the door still sags after correct adjustment, I check door weight, hinge quantity, screw holding strength, and mortise accuracy. I do not blame the hinge before I check these basics.
How Do I Adjust the Side-to-Side Gap?
An uneven side gap is easy to see. I know buyers notice it fast because it affects the finished look of the whole door set.
I adjust side-to-side alignment when the door gap is too tight on the hinge side or lock side. On a confirmed SDH-style model, I turn the spindles with a 4 mm Allen key to move the door left or right.

I use side-to-side adjustment to correct the visible gap between the door leaf and the frame. On one specific SDH-style hinge model, the spindles are adjusted with a 4 mm Allen key. In that model example, twisting left moves the door toward the hinge side, and twisting right moves the door toward the lock side. The confirmed range can be up to about 3 mm each way for that side-to-side adjustment.5 I state this carefully because not every concealed hinge has the same range or direction. I always check the installation drawing before I tell an installer which way to turn.
| Problem I see | Side-to-side action I consider | Note I check |
|---|---|---|
| Gap is too tight on hinge side | I move door toward lock side | I confirm turning direction first |
| Gap is too tight on lock side | I move door toward hinge side | I stay within the allowed range |
| Gap is uneven from top to bottom | I check all hinges together | I avoid forcing one hinge alone |
| Door rubs during closing | I adjust slowly and retest | I check latch position too |
I do not adjust only one hinge without checking the other hinges. A door is a connected system. If I push one hinge too far, I can create stress on the hinge body or make the door twist slightly.6 In factory assembly, I ask workers to adjust the top, middle, and bottom hinges in a planned way. On site, I ask installers to mark the original position when the issue is serious. This makes it easier to return to the starting point if the adjustment moves in the wrong direction. I also remind buyers that the side gap should be designed with the door thickness, frame shape, seal strip, and lock body in mind.7 Adjustment helps with final alignment, but it cannot correct a wrong door set design.
How Do I Adjust the Door Depth?
A door can close but still look wrong. I often see this when the door face sits too proud or too deep in the frame.
I adjust depth when the door needs to sit flush with the frame. I slightly loosen the fixing screws, position the door at the correct depth, then retighten the screws carefully and test closing clearance.

I treat depth adjustment as a fine positioning process. Depth affects the door face, the frame face, the seal compression, and the closing clearance.8 If I move the door too far outward, the door may look proud and the lock may not engage well.9 If I move it too far inward, the door may rub the stop or press too hard against the seal. On this type of SDH-style adjustment, I slightly loosen the fixing screws. I define fixing screws here as the screws that secure the hinge position during depth setting. I do not confuse them with clamping screws used in vertical adjustment on the example model. After I loosen them slightly, I place the door at the correct depth. Then I retighten the screws and test the door.
| Depth issue I find | What I check | What I avoid |
|---|---|---|
| Door sits proud of frame | I move it inward carefully | I do not over-compress seals |
| Door sits too deep | I move it outward carefully | I do not create latch misalignment |
| Door rubs near stop | I check frame clearance | I do not force the hinge |
| Door closes with noise | I check depth and gasket pressure | I do not blame only the lock |
Depth adjustment needs patience. I have seen after-sales cases where an installer loosened too many screws at the same time. The door shifted suddenly, and the final alignment became harder. I prefer to loosen only the required screws slightly. I keep control of the door. I retighten securely after every correction. I also check the door several times, not only once. I open it slowly, close it slowly, and check whether the lock tongue enters the strike plate smoothly. For project doors, I also check the visual line from different angles because flush alignment is part of the final appearance. A concealed hinge is often chosen for a clean look, so depth accuracy matters a lot.
What Common Mistakes Should I Avoid During Adjustment?
A hinge with adjustment is helpful. But I know it can still fail when the wrong screw is loosened or the adjustment range is ignored.
I avoid five common mistakes: loosening the wrong screws, confusing screw functions, over-adjusting, skipping door tests, and expecting adjustment to fix bad mortising or wrong hinge selection.

I keep a simple rule in my work: I identify the symptom before I touch the hinge. Many mistakes begin when a worker sees an uneven gap and turns the nearest screw. Some screws hold the hinge. Some screws lock the adjustment. Some screws move the door. These functions are not the same. If I loosen the wrong screw, the door may drop or shift.10 If I force an adjustment screw past its range, the hinge may lose stable performance.11 If I adjust depth when the real problem is vertical sagging, I waste time and create new problems. This is why I ask customers to keep the installation drawing near the assembly line or job site.
| Mistake I see | Result it can create | Better action I use |
|---|---|---|
| Loosening the wrong screws | Door shifts suddenly | I read the hinge drawing first |
| Confusing clamping and fixing screws | Adjustment becomes unstable | I confirm screw function |
| Turning too much at once | Gap becomes worse | I adjust in small steps |
| Exceeding the allowed range | Hinge performance may suffer | I stay within model limits |
| Using adjustment to cover bad mortising | Door still fails later | I correct machining first |
I also pay attention to batch production risk. One trained installer can fix one door. But a poor process can create hundreds of doors with the same problem. For door factories, I suggest a standard check: verify mortise size, install hinge body, hang the door, check vertical gap, check side gap, check depth, then lock all screws.12 For hardware buyers and product managers, I suggest asking suppliers for model-specific drawings, adjustment range, screw definition, tool requirement, and test support. At SDH Hardware, I can provide concealed hinges with practical installation support for B2B customers. I also help customers confirm whether one hinge model is suitable for their door weight, door thickness, frame design, and market standard.
Conclusion
I adjust a 3D concealed hinge by finding the real alignment issue first, making small model-specific changes, retightening screws, and testing the door carefully.
"How to Adjust in 3D - Tectus Hinges", https://www.tectushinges.com/how-to-adjust-in-3d. An architectural hardware reference defines three-dimensional concealed hinge adjustment as post-installation correction along vertical, lateral, and depth axes. Evidence role: definition; source type: institution. Supports: The source should define 3D adjustable concealed hinges as allowing adjustment along three axes, typically height, side/lateral position, and depth/compression.. Scope note: Terminology and axis names can vary by hinge manufacturer, so the source supports the general concept rather than the screw layout of the article's example model. ↩
"Load capacity & load of door hinges | Technical Data | SIMONSWERK", https://www.simonswerk.com/en/service/technical-information/load-capacities. Door and architectural hardware installation guidance treats mortise accuracy, fastener anchorage, and hinge load suitability as installation prerequisites that cannot be corrected solely through later hinge adjustment. Evidence role: expert_consensus; source type: institution. Supports: The source should explain that proper hinge mortising, adequate fastener anchorage, and hinge selection for door weight are prerequisites for successful door alignment.. Scope note: The source would provide general installation principles and may not address this exact concealed hinge model. ↩
"How To Fix a Sagging Door that's Rubbing or Won't Close!!! - YouTube",
. Building maintenance guidance explains that door sag changes the door-to-frame clearance and can produce frame rubbing and latch-to-strike misalignment. Evidence role: mechanism; source type: education. Supports: The source should describe how a sagging door changes clearances and can cause contact with the frame and misalignment between latch and strike.. Scope note: Such guidance usually addresses doors generally and not specifically concealed hinges. ↩"HES3D-E190 3-Way Adjustable Concealed Hinge ... - Instagram", https://www.instagram.com/reel/CzlPqf2sop9/. The model-specific installation drawing identifies the clamping screws, height-adjustment screws, and required 4 mm hex key for vertical adjustment on the referenced concealed hinge. Evidence role: case_reference; source type: other. Supports: The source should show that the referenced hinge model uses clamping screws and height adjustment screws and specifies a 4 mm hex or Allen key for vertical adjustment.. Scope note: This would verify the article's example model only and should not be generalized to all concealed hinges. ↩
"[PDF] 3D Adjustable Concealed Hinges - Assa Abloy", https://www.assaabloy.com/ae/en/product-assets/architectural-hardware/door-hinges/concealed-hinges/assets/documents/3D_Adjustable_Concealed_Hinges_Brochure_ME.pdf. The hinge model's technical drawing lists the available lateral adjustment range, supporting the stated approximate side-to-side movement for that model. Evidence role: case_reference; source type: other. Supports: The source should specify the lateral or side adjustment range for the exact SDH-style hinge model discussed in the article.. Scope note: The evidence is model-specific and does not establish that other concealed hinges have the same adjustment range. ↩
"Is it true that one hinge bears most of the load on a typical 3-hinge ...", https://diy.stackexchange.com/questions/185490/is-it-true-that-one-hinge-bears-most-of-the-load-on-a-typical-3-hinge-door. Architectural hardware guidance describes door hinges as a load-sharing set, indicating that uneven adjustment of one hinge can alter alignment and impose additional stress on the hinge assembly. Evidence role: mechanism; source type: institution. Supports: The source should explain that multiple hinges jointly support and locate a door leaf, so uneven adjustment can affect load distribution and alignment.. Scope note: The source may explain load sharing generally and may not directly measure door-leaf twisting from concealed hinge over-adjustment. ↩
"Chapter 4: Entrances, Doors, and Gates - Access-Board.gov", https://www.access-board.gov/ada/guides/chapter-4-entrances-doors-and-gates/. Door-set and architectural hardware guidance treats perimeter clearances as part of an integrated door, frame, seal, and hardware design rather than as an isolated hinge adjustment issue. Evidence role: expert_consensus; source type: institution. Supports: The source should show that door clearances are specified in relation to the door, frame, gasketing or seals, and hardware functions.. Scope note: The source would support the general design relationship, while exact clearance values depend on local standards and the specific door assembly. ↩
"How to Adjust Any Door Without Special Tools - YouTube",
. Door installation and gasketing guidance explains that the door leaf's position relative to the frame influences flush alignment, gasket compression, and closing clearance. Evidence role: mechanism; source type: institution. Supports: The source should explain that the door leaf's in-out position relative to the frame affects face alignment, gasket compression, and operating clearance.. Scope note: The support is contextual for door assemblies generally and may not describe the article's specific hinge adjustment screw arrangement. ↩"Door knob doesn't line up with strike plate on frame : r/DIY - Reddit", https://www.reddit.com/r/DIY/comments/18pi4iq/door_knob_doesnt_line_up_with_strike_plate_on/. Door hardware guidance notes that reliable latch engagement depends on correct alignment between the latch and strike, supporting the point that excessive depth offset can impair locking performance. Evidence role: mechanism; source type: institution. Supports: The source should explain that latch or lock engagement depends on the relative position of the door and strike plate, including alignment in the frame opening.. Scope note: The source may discuss latch-strike alignment generally rather than isolating outward concealed-hinge depth adjustment as the sole cause. ↩
"How To Install Hidden Hinges On Cabinets | Young House Love", https://www.younghouselove.com/how-to-install-cabinet-hidden-hinges/. Hinge installation instructions commonly distinguish fixing and adjustment screws and warn that releasing supporting screws without controlling the door can allow the door leaf to shift. Evidence role: general_support; source type: institution. Supports: The source should warn that hinge screws may secure the door or adjustment setting and that loosening them without support can allow movement.. Scope note: The source may be from a hardware manual and therefore applies most directly to the hinge type or model covered by that manual. ↩
"[PDF] SECTION 08 71 00 DOOR HARDWARE - Nash County", https://www.nashcountync.gov/DocumentCenter/View/13355. Architectural hardware installation guidance states that adjustable hinge mechanisms should be set within their specified adjustment limits, because forcing beyond those limits can impair function or stability. Evidence role: mechanism; source type: institution. Supports: The source should state that hinge adjustments must remain within the specified range and that forcing beyond that range can damage or destabilize the mechanism.. Scope note: The evidence would support the general engineering principle; the exact failure mode depends on the hinge design. ↩
"[DOC] 064113", https://online2.ogs.ny.gov/dnc/masterspec24/docs/Division06WoodPlasticAndComposites/064113.0WoodVeneerFacedArchitecturalCabinets.docx. Quality-management and architectural woodwork guidance supports the use of standardized inspection checkpoints for repeated door production tasks, including verifying machining, hardware fitting, alignment, and final fastening. Evidence role: expert_consensus; source type: institution. Supports: The source should support the value of standardized inspection or quality-control checkpoints for repeated manufacturing or installation operations, ideally including door machining and hardware fitting.. Scope note: The source may support standardized quality control broadly and may not prescribe the exact sequence used in the article. ↩
