
How does a concealed door hinge work?
I see buyers love the clean look. But many do not trust the mechanics.1 Bad picks lead to sag, rubbing, and claims. I will make the core idea simple.
A concealed door hinge is mortised into the door and frame. Its linkage and pivot sit hidden inside the bodies. The door rotates on internal arms and bearings. After installation, I fine‑tune height, depth, and lateral position using adjustment screws to get smooth gaps and alignment.

I will explain how the system works, how I select load capacity, and how I install and adjust. I will also show where it fits best. I will use real steps I use in my factory and in customer calls, so you can act with confidence.
What is inside a concealed hinge and how does it move?
Many people think it is just a normal hinge that hides inside the door. It is not. If you treat it that way, gaps will go off, and you will blame the hinge.
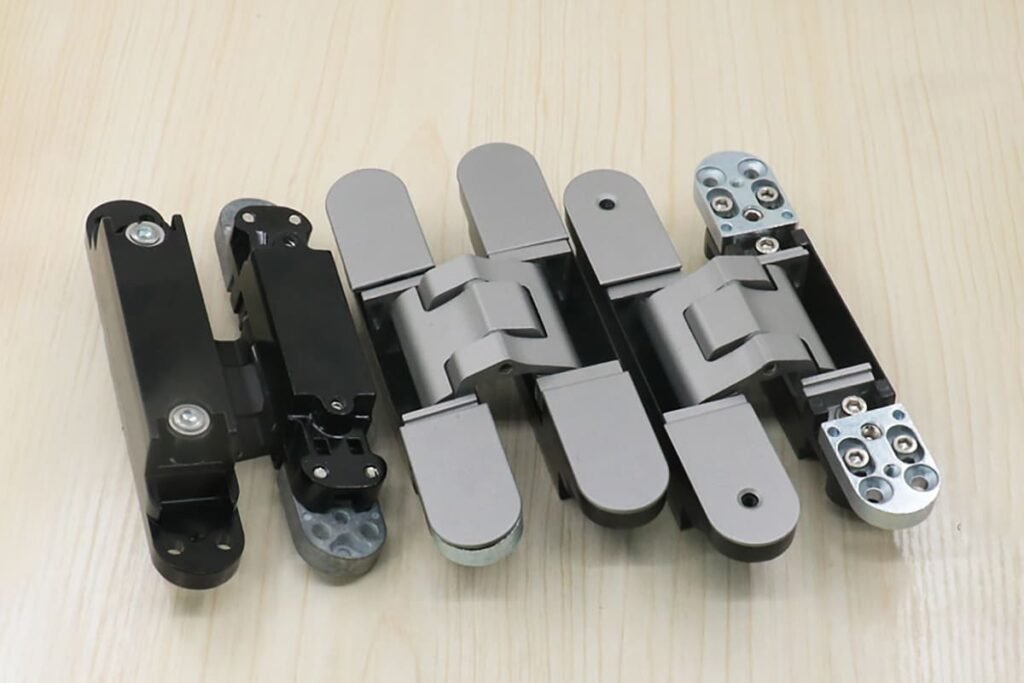
A concealed hinge has two mortised bodies and internal link arms. The door swings as the arms rotate and fold inside the hinge body. The connector stays hidden when closed. Bearings or bushings guide motion.2 Screws on the body allow later fine adjustment.

Core components
- Door‑side body
- Frame‑side body
- Linkage arms (scissor style)3
- Pivot pins and bearings/bushings
- Adjustment screws (height, depth, lateral)
- Cover caps and fastening screws
Movement path
The link arms form a compact scissor. As I open the door, the arms unfold and shift the pivot path inward. This clears the frame edge and hides the connector.4 When I close the door, the arms fold back, and the connector sits inside the body. No knuckle shows. The motion is smooth when the bearings fit well and the bodies align.
| Part | Role | What I check in QC |
|---|---|---|
| Door body | Houses half of mechanism | Mortise size, wall thickness |
| Frame body | Houses other half | Flatness, thread strength |
| Link arms | Create hidden rotation | Play, coating, pin fit |
| Bearings/bushings | Reduce friction | Smoothness, noise under load |
| Adjust screws | 3D fine tuning | Travel range, hold after torque |
I do not rely only on the hidden look. I check the linkage play, screw travel, and body hardness. If these fail, beauty will not save the door.
How do I choose a concealed hinge by door size and weight?
Many quotes start from a catalog page. That is risky. Doors vary in thickness, height, and core. Wrong capacity leads to sag, latch misalignment, and callbacks.5
I start from the door. I measure thickness, width, height, and real weight. I check the frame structure. I pick a hinge model with load rating above the door weight and fit to door thickness. I choose the right count and spacing.

Start from the door
I ask four things first in every inquiry:
- Door thickness
- Door height and width
- Door weight or core type
- Frame or aluminum profile drawing
Then I check the opening angle, finish, and any special need like fire rating. The hinge size must match the door thickness. The load rating must exceed the real door weight. I add a safety margin based on use and door width.
Load, count, and spacing
- Small doors need 2 hinges. Tall or heavy doors need 3 or 4.
- I place the top hinge near the top edge to reduce sag.6
- I spread the middle hinge to stabilize the center.
| Door type (example) | Size/weight (example) | Likely hinge class | Hinge count | Notes |
|---|---|---|---|---|
| Cabinet/light panel | ≤ 35 mm, ≤ 15–25 kg | Light duty concealed | 2 | Short screws, small bodies |
| Interior wood door | 40–45 mm, 25–60 kg | Medium duty concealed | 3 | Common for apartments |
| Wide/solid core interior | 45–50 mm, 60–100 kg | Heavy duty concealed | 3–4 | Check door width and closer use |
| Extra tall/heavy feature | 50–60 mm, 120–180+ kg | Extra heavy concealed | 4 | Use reinforced frame, pro install |
| Aluminum profile door | Profile‑based | Profile‑matched concealed | 2–4 | Match to profile drawing and screw bosses |
These ranges are examples. I do not say one 15 kg or 300 kg hinge fits all. For aluminum profile doors, I must read the profile drawing. I confirm pocket depth, screw bosses, reinforcement, and clearances. I also check accessories. Magnetic locks and zinc alloy or stainless steel handles add weight. I include them in the total.
How do I install and adjust a concealed hinge for best performance?
A strong hinge will still fail if the mortise is wrong. A 1 mm error can show as a rubbing edge and a noisy latch.7 Good adjustment solves this.
I mortise both sides to the template. I predrill, mount the bodies, hang the door, and then adjust height, depth, and lateral screws. I set even gaps and smooth latching. I tighten and recheck.

Mortise accuracy matters
- I use the maker’s template and router.
- I keep wall thickness per spec to avoid crack or screw pull‑out.
- I check frame plumb and floor level before hanging.
- I leave uniform gap plans, often 3 mm, unless the project asks otherwise.
Adjustment screws
Most models give three axes:
- Height: lifts the door leaf up or down.
- Lateral: moves the leaf toward or away from the hinge side.
- Depth: moves the leaf in or out, flush with the frame.
| Adjustment | Typical range | What it fixes |
|---|---|---|
| Height | ±2–3 mm | Head gap, latch strike position |
| Lateral | ±2–3 mm | Hinge‑side rub or reveal |
| Depth (in/out) | ±1.5–2.5 mm | Flushness with frame, seal touch |
Common errors I avoid
- Over‑mortising the pocket, which weakens the body support.8
- Mixing screw types. I use the screws supplied. They match thread and hardness.
- Over‑tightening adjusters. I set torque. I check that the door holds position after full cycles.
- Forgetting hardware stack. Closers, seals, and magnetic locks change gap feel. I adjust after all parts are on.
If a project is fire‑rated, I only use the approved hinge model and the right intumescent pads or seals. I follow the test report. I do not assume any concealed hinge is fire‑rated.
Where can I use concealed hinges, and what should I check first?
I see teams push concealed hinges into every door. That is not wise. Some doors need different hardware. Some frames do not accept deep pockets.
I use concealed hinges for interior wood doors, invisible flush doors, cabinets, and some aluminum profile systems.9 I check door thickness, weight, frame material, clearance, and opening angle first. I confirm any needed certifications per model.

Interior wood doors
These are the most common. I match 40–45 mm doors to medium duty concealed hinges. I pair with magnetic locks and zinc alloy or stainless steel handles for a clean look. I set 3 hinges for tall doors. I avoid hollow frames without reinforcement.
Invisible flush doors
These need tight, even reveals. I rely on the depth adjuster to set flushness with wall panels. I plan for hidden frames and finishes. I tell the site team to plaster and paint after dry fitting. Any twist in the frame will show. The hinge cannot hide waves.
Cabinets and light panels
I use compact bodies. I keep screws short and strong. I do not assume the small hinge is quiet or soft‑close unless the model has that feature. I keep the opening angle in mind. A 180‑degree model helps in narrow corridors.
Aluminum profile doors
I never guess here. I ask for the exact profile drawing. I match hinge pocket depth, fastener positions, and reinforcement plates. I check the glass thickness if it affects weight. I also check the thermal break position. Wrong screws can crush the profile. I pick a hinge model designed for that profile.
| Scenario | Typical thickness | Hinge size class | Checks before order |
|---|---|---|---|
| Interior wood | 40–45 mm | Medium | Weight, reveal, closer, seal pressure |
| Flush/invisible | 45–50 mm | Medium to heavy | Frame rigidity, wall finish, reveal plan |
| Cabinet/light panel | 16–35 mm | Light | Screw grip, edge distance, opening angle |
| Aluminum profile | Profile‑defined | Profile‑specific | Profile drawing, reinforcement, hardware stack |
I do not say concealed hinges are soundproof or dustproof by default. They can reduce exposed edges that trap dust. They can improve the perceived seal when doors and seals are set well. The final result depends on the door, the frame, and the installer.
What benefits and trade‑offs should I expect from concealed hinges?
I love the clean line. Many architects do too. But I also count the cost and the work on site. I tell buyers both sides before they decide.
You gain a clean look, less dust on exposed parts, and better perceived sealing. You need precise mortising, careful adjustment, and a higher unit cost. Not all models are silent or fire‑rated. Plan load, frame, and install skills.

Benefits beyond looks
- Clean, modern lines please owners and designers.
- No protruding knuckles, so less snag risk.
- Less exposed hardware, so less dust on hinge parts.
- 3D adjustment helps align after floor or frame shifts.10
Limits and care
- Tighter tolerances. A small error shows.11
- Longer install time at first. My crews get faster with jigs.
- Higher part cost. Total cost can still drop if callbacks fall.
- Some models do not reach 180 degrees. I check angle needs.
When I do not suggest them
- Very weak frames that cannot hold deep pockets.
- Very low budgets with no time for training.
- Doors that need frequent removal by non‑pros. Standard butt hinges can be simpler there.
| Expectation | Reality with concealed hinge | Condition for success |
|---|---|---|
| Always silent | Not always. Depends on model and seals | Good bearings, correct load, good seals |
| Fire‑rated by default | Not by default | Use certified model and follow test report |
| Fits any heavy door | Only if rated for that door | Match weight, width, and hinge count |
| Easy install anywhere | Needs skill and templates | Train crew, use correct tools |
I have seen projects save money by using fewer call‑backs and better door alignment. I have also seen rushed jobs where a good hinge looked bad due to poor pockets. I choose based on the door, the frame, and the team.
Conclusion
A concealed hinge hides the linkage in mortised bodies, then relies on correct load, accurate pockets, and 3D adjustment. Start from the door data, match the model, and install with care.
"Concealed Hinge | Innovative Door Hardware | Sugatsune", https://www.sugatsune.com/hes-concealed-hinge-line/?srsltid=AfmBOoo2fmpoYKAmqlVMGsileC8AwVa5Ekwi_VJrBjgMTlyATN4iwr2N. This claim reflects a common market perception regarding the aesthetic appeal of concealed hinges and potential concerns about their mechanical reliability, as observed in industry trends or customer feedback. Evidence role: general_support; source type: research. Supports: market perception regarding the aesthetic appeal and mechanical reliability concerns of concealed door hinges. Scope note: Specific data on buyer trust levels may vary by region or product segment. ↩
"Heavy Duty Pivot Hinge for Wood Door with 360 Degree Rotation ...", https://www.amazon.com/Rotation-Bookcase-Invisible-Hardware-Bookshelf/dp/B0D44VFC8N. For a detailed explanation of the mechanical principles and internal components of concealed door hinges, including the function of link arms, hidden connectors, and bearings or bushings in guiding door motion, refer to engineering or architectural hardware guides. Evidence role: mechanism; source type: education. Supports: the mechanical principle and internal operation of concealed door hinges, including the role of link arms, hidden connectors, and bearings/bushings. ↩
"Concealed Hinge Guide - Woodworker's Hardware", https://www.wwhardware.com/concealed-hinge-buying-guide?srsltid=AfmBOor7V21pdCr4R597XHRi79u35QChqiSsiZH-O_2UjP_CrquB2ejv. The 'scissor style' linkage arms are a common design feature in many concealed hinges, enabling the complex folding and unfolding motion required for hidden operation. Evidence role: definition; source type: education. Supports: the common design of linkage arms in concealed hinges as 'scissor style' mechanisms. Scope note: While common, not all concealed hinges may use this exact terminology or design variation. ↩
"Not all 360° hinges are the same — and choosing the wrong one ...", https://www.instagram.com/reel/DWnyC9-ggJC/?hl=en. The design of concealed hinges allows the internal arms to shift the door's pivot path inward as it opens, a kinematic feature that ensures clearance from the frame edge and maintains the hidden nature of the connector. Evidence role: mechanism; source type: education. Supports: the kinematic action of concealed hinge arms shifting the pivot path inward during opening to clear the frame edge and keep the connector hidden. ↩
"Door Hinge Wear Problems - ASP Windows and Doors", https://www.aspwindows.com/blog/door-hinge-wear-problems. Industry guidelines and field observations confirm that selecting concealed hinges with insufficient load capacity is a primary cause of door sag, latch misalignment, and subsequent service callbacks, impacting long-term performance and maintenance. Evidence role: general_support; source type: research. Supports: the common problems that arise from selecting concealed hinges with inadequate load capacity, such as door sag, latch misalignment, and the need for callbacks. ↩
"Hinge Placement Rules and Traditions", https://woodweb.com/knowledge_base/Hinge_Placement_Rules_and_Traditions.html. Standard installation guidelines for door hinges recommend placing the top hinge closer to the top edge of the door to optimize load distribution and minimize the potential for door sag over time. Evidence role: expert_consensus; source type: education. Supports: the best practice of positioning the top hinge closer to the top edge of a door to effectively reduce or prevent door sag. ↩
"Risk Factor Analysis of Hinge Fusion Failure after Plate-Only Open ...", https://pmc.ncbi.nlm.nih.gov/articles/PMC4303478/. Precision in mortising for concealed hinges is paramount, as even minor deviations, such as a 1 mm error, can significantly impact door operation, leading to issues like rubbing edges and noisy latches due to misaligned components. Evidence role: general_support; source type: education. Supports: the critical importance of precise mortising for concealed hinges, where even small errors (e.g., 1 mm) can result in functional problems like rubbing edges and noisy latches. Scope note: The exact threshold for noticeable issues may vary slightly depending on hinge design and door type. ↩
"How to mortise a door and door frame - YouTube",
. Excessive mortising of the hinge pocket beyond manufacturer specifications can structurally weaken the surrounding material, thereby reducing the effective support for the concealed hinge body and potentially leading to premature failure. Evidence role: general_support; source type: education. Supports: the structural risk associated with over-mortising hinge pockets, which can compromise the support and integrity of the concealed hinge body. ↩"The Ultimate Guide to Concealed Cabinet Hinges", https://www.woodworkerexpress.com/blog/2025/01/types-of-concealed-cabinet-hinges/?srsltid=AfmBOop-nXKqhXa5fYhdzcPsggRi45iinjIipb4DlLnM8HKNKpCgdr1A. Concealed hinges are widely adopted in architectural and furniture design for applications such as interior wood doors, invisible flush doors, cabinetry, and specialized aluminum profile systems, valued for their aesthetic and functional benefits. Evidence role: general_support; source type: other. Supports: the common applications of concealed hinges across various door types, including interior wood doors, invisible flush doors, cabinets, and specific aluminum profile systems. Scope note: Suitability for specific applications depends on hinge model, door specifications, and installation requirements. ↩
"Why 3D Adjustable Concealed Hinges are the Game-Changer", https://www.assaabloy.com/ae/en/stories/access-stories/why-3d-adjustable-concealed-hinges-are-the-game-changer-your-doors-need. The three-dimensional adjustment feature inherent in many concealed hinges provides a practical mechanism for maintaining precise door alignment, offering a solution to compensate for minor shifts or settlement in building floors or door frames post-installation. Evidence role: general_support; source type: education. Supports: the utility of 3D adjustment in concealed hinges for maintaining door alignment, particularly in response to minor structural shifts in floors or frames over time. Scope note: The extent of compensation is limited by the hinge's adjustment range and the severity of the structural shift. ↩
"How to Install Cabinet Hinges in 4 Easy Steps - Eagle Woodworking", https://www.eaglewoodworking.com/blog/how-to-install-cabinet-hinges. Due to their hidden nature and precise operational requirements, concealed hinges demand significantly tighter installation tolerances compared to traditional hinges, as even small deviations can lead to visible aesthetic flaws or functional issues. Evidence role: expert_consensus; source type: education. Supports: the necessity for tighter installation tolerances with concealed hinges, where minor inaccuracies can significantly impact aesthetic and functional performance. ↩
