
How to Install a Fire Door Lock Step by Step?
I see many lock failures start before installation begins. I see one wrong hole create delays, complaints, and costly project rework.
I install a fire door lock by first confirming the lock drawing, door compatibility, certificate scope1, and accessory configuration. I then mark, cut, fit, fasten, and test the lock, strike, cylinder, handles, screws, and covers according to the approved template and project requirements.

I do not treat a fire door lock as a normal DIY part. I treat it as one part of a tested door system2. Before I cut the door, I check the lock body, forend, strike plate, backset, C-C distance, door thickness, cylinder length, handle set, screw pack, and project documents. I have seen buyers receive a lock that looks correct on the table, but the lock fails on site because the handle hole does not match the lock case, or the strike plate does not fit the frame. This guide explains the installation flow from my hardware supplier view, so I can reduce fitting risk before the door leaf or frame is damaged.
What Should I Confirm Before Cutting the Fire Door?
I see the biggest installation risk when I rush measurement. I can replace a screw, but I cannot easily repair a wrong mortise cut.
I confirm the lock drawing, door type, door thickness, backset, C-C distance, lock body depth, forend size, strike size, cylinder type, handle set, and certificate scope before cutting.

I start with the product drawing, not with guesswork. I measure the real lock body and compare it with the technical sheet. I check the lock case height, lock case depth, forend width, forend length, and screw hole positions. I also check the strike plate size and the latch or bolt position. I do this because a small difference can create a large problem after bulk installation.
I also confirm the door thickness and the door core condition. A fire door can have steel, timber, composite, or other tested structures.3 I avoid cutting beyond the approved area.4 I also check whether the project requires CE documents, fire-related documents, panic function, bathroom function, classroom function, or other special lock function. I do not assume that one lock can fit every market or every fire-rated door.
| Item I Check | Why I Check It | Risk If I Ignore It |
|---|---|---|
| I check the lock drawing | I need the correct cutting reference | I may cut the door in the wrong position |
| I check the backset | I need the handle and cylinder line to sit correctly | I may cause handle misalignment |
| I check the C-C distance | I need the lever and cylinder holes to match | I may make the cylinder hole unusable |
| I check door thickness | I need the right spindle, cylinder, and screws | I may get loose handles or short screws |
| I check certificates | I need the product to match the project scope | I may create approval or compliance risk |
From a supplier view, I always tell buyers to confirm the complete set before installation. The lock body alone is not enough. The cylinder, lever handle, spindle, escutcheon, screws, strike plate, dust box, and covers must match the same configuration.5 If one small accessory changes, the installer may stop the work. In a bulk order, this small mismatch can become hundreds of customer complaints.
How Do I Mark the Lock Body, Backset, and C-C Distance?
I see many clean doors become scrap because the first pencil line was wrong. I always slow down before I mark holes.
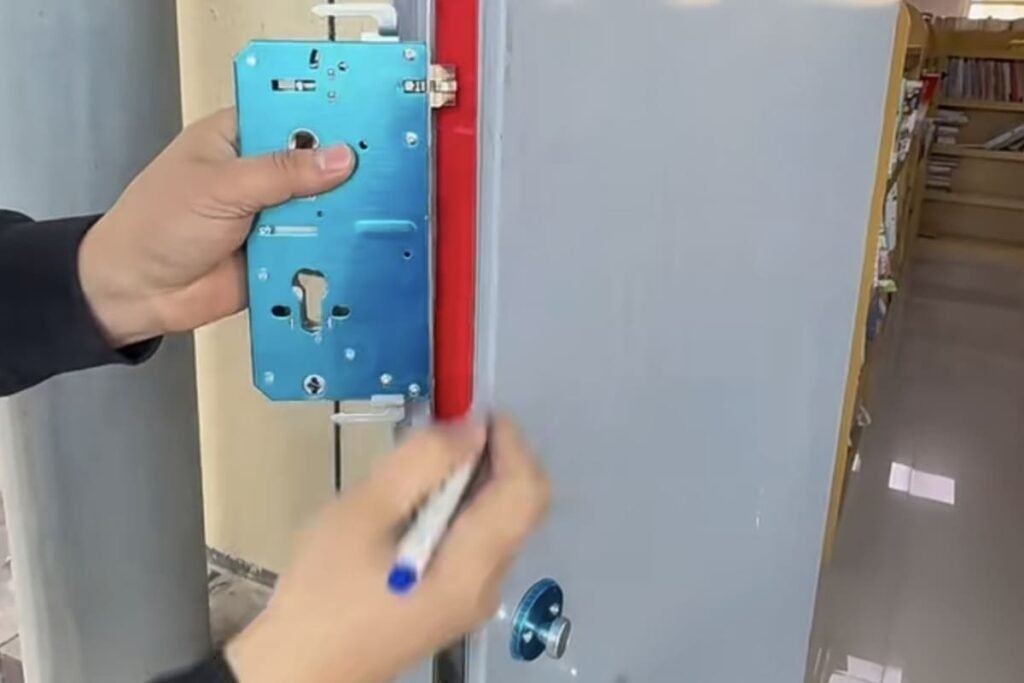
I mark the lock height, lock body position, backset line, spindle hole, cylinder hole, forend outline, and strike position with the approved template or product drawing.

I place the lock body against the door edge and confirm the lock height required by the project. I do not use a random height unless the project allows it. I mark the lock body position on the door edge. I then mark the forend outline. I use the real lock and the approved template together, because printed templates can shift or print at the wrong scale.
I then mark the backset from the door edge to the spindle centerline or cylinder centerline, based on the lock drawing. I mark the C-C distance between the handle spindle center and the cylinder center. I do not transfer dimensions from another lock unless the lock series is confirmed as the same. Different mortise locks can look similar, but the hole centers can be different.
| Marking Point | What I Do | What I Avoid |
|---|---|---|
| I mark the lock height | I follow the project or door factory standard | I avoid random site decisions |
| I mark the forend outline | I trace the actual forend and drawing | I avoid cutting too wide |
| I mark the backset | I measure from the door edge as specified | I avoid copying another model |
| I mark the C-C distance | I confirm handle and cylinder centers | I avoid handle and cylinder conflict |
| I mark both door sides | I use careful reference points | I avoid angled or uneven drilling |
I also mark the frame side only after I understand the latch and bolt position. I keep the door, hinges, and closer in mind. A fire door lock must help the door close and latch.6 It should not fight with the closer or hinges. If the strike position is too high, too low, too deep, or too shallow, the door may look closed but fail to latch smoothly. I treat this marking stage as the main quality control point. Cutting is only the result of the marking decision.
How Do I Cut the Mortise and Prepare the Frame Strike?
I know cutting feels like the real work, but bad cutting only proves bad preparation. I cut only after all lines are checked.
I cut the lock pocket, forend recess, spindle hole, cylinder hole, and strike recess according to the lock drawing, door design, and approved installation template.

I begin with the mortise pocket in the door edge. I make the pocket deep enough for the lock case, but I do not remove more material than needed.7 I keep the walls straight and clean. I test fit the lock body several times. I want the lock to slide in without force, and I want the forend to sit flush with the door edge. If the lock body is forced into a tight pocket, the case can twist8. That twist can make the latch, deadbolt, follower, or cylinder cam work badly.
I cut the forend recess after I confirm the lock case sits correctly. I want the faceplate to sit level with the door edge. A proud faceplate can scrape the frame. A sunken faceplate can create poor alignment. I then drill the spindle and cylinder holes from the marked centers. I use the lock drawing as the guide. I avoid giving one universal drilling size because the hole size depends on the lock model, handle rose, escutcheon, and cylinder profile.
| Cutting Area | My Main Goal | My Quality Check |
|---|---|---|
| I cut the lock pocket | I fit the lock body without stress | I confirm the case is not twisted |
| I cut the forend recess | I make the faceplate flush | I check the door edge by hand |
| I drill spindle hole | I align the handle follower | I test the spindle before final fixing |
| I drill cylinder hole | I align the cylinder cam | I test cylinder insertion |
| I cut strike recess | I align latch and bolt entry | I close the door slowly and check contact |
I prepare the frame strike with the same care. I mark the latch and bolt position after the door is hung or after the door factory confirms the exact frame reference. I cut the strike recess so the strike plate sits flush. I also confirm the depth behind the strike opening. The latch and bolt need enough space to enter fully.9 I do not change the fire door frame structure in a way that conflicts with the project documents or local rules.10 If the door set has a tested fire rating, I respect the approved hardware locations and installation instructions.
How Do I Fit the Lock Body, Cylinder, Handles, and Accessories?
I see many locks fail after correct cutting because the accessory set is mixed. I always fit the full set as one matched system.
I install the mortise lock first, then the strike, cylinder, spindle, lever handles, escutcheons, screws, covers, and any function parts in the correct order.

I insert the mortise lock body into the door pocket and fasten the forend screws. I do not overtighten screws at the first step. I first make sure the latch moves freely. I then install the strike plate on the frame and check the first contact between the latch and strike. I want smooth contact. I do not want the latch to crash into the strike edge.
I install the cylinder after the lock body is seated. I check the cylinder length against the door thickness and escutcheon thickness. A cylinder that is too short may not operate correctly. A cylinder that projects too much may create security and appearance concerns.11 I fasten the cylinder screw through the lock forend, then I test key operation from both sides. I do this before fitting final covers because early testing saves time.
| Accessory | What I Confirm | Common Problem I Prevent |
|---|---|---|
| I confirm the cylinder | I match length, profile, and cam | I prevent poor key operation |
| I confirm the spindle | I match length and follower size | I prevent loose or blocked handles |
| I confirm lever handles | I match rose, plate, and fixing type | I prevent weak handle fixing |
| I confirm screws | I match door thickness and hardware | I prevent stripping or loose parts |
| I confirm covers | I make them sit flush | I prevent poor final appearance |
I then fit the spindle and lever handles. I check the handle return before I tighten everything fully. The handle should move down and return by spring force if the lock and handle set are designed that way. I fit escutcheons, roses, plates, and covers after the function test. If the lock has a special function, I test that function at this stage. This may include escape operation, privacy operation, classroom operation, or project-specific access control connection. I do not claim the function is compliant only because it moves. I connect the function check to the product certificate, manufacturer instruction, and project requirement.
What Checks Should I Make After Installation?
I know a lock can look finished and still fail in daily use. I always test the door like a real user and a buyer.
I check latch entry, bolt throw, handle return, key operation, screw tightness, cover position, door closing, escape function, and project-specific requirements after installation.

I close the door slowly first. I listen and feel. The latch should enter the strike without heavy force. The door closer, hinges, latch, and strike should work together. If I need to slam the door, I treat that as a problem. A fire door should close and latch reliably under the intended conditions.12 I then operate the lever handle many times. The handle should not sag, bind, or rub the escutcheon.
I test the cylinder from both sides. I check that the key turns smoothly and the bolt throws fully, if the lock has a deadbolt. I also check that the cylinder fixing screw is secure. I inspect all visible screws. I check that covers sit flush and do not hide loose fixing. I also inspect the forend and strike plate. I want both plates to sit flat without sharp edges, gaps, or interference.
| Final Check | My Pass Condition | My Action If It Fails |
|---|---|---|
| I check latch entry | I see smooth entry into strike | I adjust strike position or door alignment |
| I check handle return | I see full return without sagging | I inspect spindle, fixing, and lock stress |
| I check key operation | I feel smooth turning both sides | I inspect cylinder length and alignment |
| I check bolt throw | I see full movement into the frame | I inspect strike depth and lock position |
| I check door closing | I see reliable closing and latching | I inspect closer, hinges, and latch contact |
I also check the paperwork side. This is important for importers, wholesalers, and project buyers. The installed lock may work in the door, but the project can still face risk if the supplied lock, cylinder, handle, strike, and screws do not match the certified configuration. Fire-rated door hardware is not only about movement. It is also about the tested or approved scope. I always suggest that buyers keep product drawings, CE documents, fire-related documents, installation instructions, batch records, and accessory lists together. This makes after-sales service easier, and it reduces argument when a customer asks why one door performs differently from another.
How Can Buyers Reduce Bulk Installation Problems Before the Order?
I see bulk problems begin when the sample is approved but the accessory list is unclear. I always control the set, not only the lock.
I reduce bulk installation problems by confirming drawings, samples, accessory lists, finishes, screw packs, certificates, packaging labels, and installation templates before mass production.

I handle fire door lock sourcing as a system task. I do not only ask for a price of one lock body. I ask for the full door hardware configuration. I confirm the mortise lock model, backset, C-C distance, forend type, strike type, cylinder profile, cylinder length, lever handle style, spindle size, screw pack, finish, and packing method. I also ask whether the certificates cover the same product configuration that I plan to sell or use.
I have seen buyers approve a sample with one strike plate and receive bulk goods with another strike plate. I have also seen a handle set use a different screw length after a finish change. These issues look small in the warehouse, but they become serious on site. Door factories work with flow. Installers do not want to stop every few minutes to modify screws, enlarge holes, or adjust plates.
| Buyer Control Point | What I Request | Why It Matters |
|---|---|---|
| I request a full drawing | I need all main dimensions | I reduce wrong cutting risk |
| I request a complete sample set | I need the real installation set | I prevent missing accessories |
| I request certificate review | I need scope and model match | I reduce project approval risk |
| I request finish confirmation | I need batch consistency | I reduce visual complaints |
| I request packing labels | I need easy site handling | I reduce mixed product mistakes |
From my manufacturer and supplier view, I also support customers with accessory matching before shipment. I check whether the cylinder length matches the door thickness. I check whether the handle set matches the lock follower. I check whether the screw pack matches the expected installation. I check whether the finish is consistent across lock forend, strike plate, handle, cylinder trim, and other visible parts. This preparation does not replace the installer’s work or local approval. It helps the buyer reduce avoidable mistakes before the goods reach the project site.
Conclusion
I install a fire door lock safely by measuring first, cutting only by approved drawings, fitting the full set, and testing function, documents, and compliance scope.
"SIST EN 1634-1:2014+A1:2018 - Fire Resistance Test for Doors and", https://standards.iteh.ai/catalog/standards/sist/ee82f4f9-9568-41f8-a1f4-c805f6a4c814/sist-en-1634-1-2014a1-2018?srsltid=AfmBOorFcav1EV67-hblXqYRVDW3Xm9YyU5uU8DJItGyzQwbhC7TkWyz. Fire door certification guidance generally limits approval to the tested or assessed configuration, so the lock, strike, handles, and related accessories should be checked against the applicable certificate scope before installation. Evidence role: general_support; source type: institution. Supports: Certification or test evidence for fire doors and hardware applies to defined product configurations and intended uses, so substitutions should be checked against the certificate scope.. Scope note: This supports the compliance principle; the exact acceptable configuration must be verified against the specific certificate for the project. ↩
"[PDF] Fire Door Maintenance", https://www.colorado.edu/firelifesafety/sites/default/files/attached-files/firedoormaintenance2007.pdf. Fire door standards such as NFPA 80 treat locks and latching hardware as components of a listed fire door assembly and require installation in accordance with the listing and the manufacturer's instructions. Evidence role: expert_consensus; source type: institution. Supports: Fire door locks and latching hardware are regulated as components of a fire door assembly and should be installed consistently with the assembly listing and manufacturer instructions.. ↩
"Fire door - Wikipedia", https://en.wikipedia.org/wiki/Fire_door. General fire door references describe fire doors as assemblies made from varied materials, including timber, steel, glass-containing, and composite constructions, with performance depending on the tested design. Evidence role: definition; source type: encyclopedia. Supports: Fire doors are manufactured in multiple construction types, commonly including timber, steel, glass-containing, and composite constructions, depending on the tested assembly.. Scope note: This is contextual support for material variety, not proof that any specific door construction in the article has a particular fire rating. ↩
"Locksmith Ledger: Altering Fire Door Assemblies – Job Site ...", https://idighardware.com/2022/10/locksmith-ledger-altering-fire-door-assemblies-job-site-preparations-vs-field-modifications/. NFPA 80 and comparable fire door guidance restrict job-site preparation and field modifications to approved or permitted operations, reflecting that unapproved cutting can affect the listed fire door assembly. Evidence role: expert_consensus; source type: institution. Supports: Fire door standards restrict job-site preparation and field modifications because unapproved cutting may affect the listed fire door assembly.. ↩
"[PDF] DOOR HARDWARE (SCHEDULED BY DESCRIBING PRODUCTS)", https://fpm.usc.edu/wp-content/uploads/2021/11/087102-USC-HSC-door-hardware-Guide-Specification_1.pdf. Fire door assembly guidance requires hardware to be installed as listed, labeled, or otherwise approved, which supports checking that cylinders, levers, spindles, strikes, screws, and covers match the specified configuration. Evidence role: general_support; source type: institution. Supports: Fire door hardware components, including latches, strikes, fasteners, and accessories, should conform to the listed or approved assembly configuration and installation instructions.. Scope note: This supports the need for configuration control; the source may not list every accessory named in the article. ↩
"716.2.6 Fire Door Hardware and Closures - UpCodes", https://up.codes/s/fire-door-hardware-and-closures. Building code provisions for fire door assemblies commonly require self-closing or automatic-closing operation and positive latching, showing that the lock or latchset is part of the door's required fire-protection function. Evidence role: expert_consensus; source type: government. Supports: Building codes and fire door standards require many fire door assemblies to be self-closing and positively latching, making the lock or latch function essential to door performance.. Scope note: Specific requirements vary by jurisdiction, occupancy, and door location. ↩
"A Guide to Fire Rated Mortice Lock - DIROCK Door Hardware", https://www.dirock.com/A-Guide-to-Fire-Rated-Mortice-Lock-id49457775.html. Fire door installation and inspection standards limit door preparation and field modifications because removing material beyond the approved hardware preparation can alter the tested construction of the door leaf. Evidence role: mechanism; source type: institution. Supports: Fire-rated doors are tested assemblies, and excessive or unauthorized cutting can affect the door leaf's construction and the assembly's compliance with its rating.. ↩
"How to Install a Mortise Lock Set Like a Pro! Avoid ...",
. Technical installation guidance for mortise locks commonly requires a properly sized, aligned mortise and cautions against stressing the lock case, since distortion or misalignment can cause latch, bolt, follower, or cylinder binding. Evidence role: mechanism; source type: institution. Supports: Mortise locks should be installed in correctly sized and aligned pockets so the case is not stressed, which can cause binding or unreliable latch, bolt, follower, or cylinder operation.. Scope note: This is mechanical support from installation guidance and may not be specific to fire-rated locks unless the chosen source addresses fire door hardware directly. ↩"[PDF] SECTION 08 71 00 FINISH HARDWARE - FIU Facilities Management", https://facilities.fiu.edu/documents/forms_standards/fiu_hardware_standard.pdf. Fire door and door hardware guidance links positive latching to proper engagement of the latchbolt with the strike, which requires adequate strike opening and depth for the latch or bolt to enter fully. Evidence role: mechanism; source type: institution. Supports: Proper strike preparation is necessary for the latch or bolt to engage the frame, supporting positive latching and reliable door function.. Scope note: The exact required depth or clearance depends on the lock model and the applicable door assembly listing. ↩
"[PDF] Alterations to Fire Door Assemblies - I Dig Hardware", https://idighardware.com/wp-content/uploads/2014/10/Decoded-Dec14-Alterations-to-Fire-Doors.pdf. Fire door standards address field modifications to fire door frames and generally require them to remain within the listing, approval, or authority-having-jurisdiction requirements. Evidence role: expert_consensus; source type: institution. Supports: Fire door frame modifications are controlled by standards and listings, and unauthorized changes may invalidate or compromise the approved assembly.. ↩
"Euro Cylinder Locks Explained - Master Key Systems", https://www.masterkeysystems.co.uk/knowledge-hub/euro-cylinder-locks-explained/. Security guidance for door cylinders commonly warns against excessive cylinder projection because exposed cylinders can be more susceptible to physical attack, although the acceptable projection depends on the cylinder type and protective furniture. Evidence role: general_support; source type: government. Supports: Security guidance often treats excessive cylinder projection as undesirable because exposed cylinders can be more vulnerable to attack methods such as gripping or snapping.. Scope note: This supports the security concern generally; it does not establish a fire-performance requirement for cylinder projection. ↩
"Self-Closing Doors - HPD - NYC.gov", https://www.nyc.gov/site/hpd/services-and-information/self-closing-doors.page. Building regulations and fire door standards generally require relevant fire door assemblies to close and latch reliably, because an unlatched or open fire door may not perform as intended during a fire. Evidence role: expert_consensus; source type: government. Supports: Fire safety codes and building regulations require fire doors in many locations to close and latch so they can resist smoke or fire spread as designed.. Scope note: Requirements differ by jurisdiction, door location, and whether the door is required to be self-closing, automatic-closing, or normally closed. ↩
