
How to Calibrate Adjustable Hinges?
A loose door looks small at first. It soon becomes rubbing, noise, bad closing, and customer complaints if I ignore hinge alignment.
I calibrate adjustable hinges by checking the door issue first, then adjusting vertical, lateral, and depth positions within the hinge limits. I inspect gaps, flushness, closing feel, and latch alignment after every change. Calibration works only when drilling, frame accuracy, door weight, and installation conditions are correct.

I often see buyers treat hinge calibration as simple screw tightening. I understand why. The hinge is small, and the door problem looks visible. Still, I have learned from concealed hinge support that calibration is a controlled 3D alignment job. I need to know what the door is doing before I touch the screws. I also need to know what each adjustment direction can and cannot change. If I skip this order, I may correct one gap and create another problem.
What Should I Check Before I Adjust a Concealed Adjustable Hinge?
A door may look uneven, but the hinge may not be the only reason.1 I risk wasting time if I adjust without diagnosis.
I first check the real symptom. I look for uneven clearance, looseness, rubbing, imbalance, latch misalignment, or poor closing feel before I adjust any screw.

I use diagnosis as the first step because concealed adjustable hinges have limits2. I do not use adjustment to cover wrong drilling, a twisted frame, an unsuitable hinge model, or a deformed door leaf. I first open and close the door slowly. I watch the top gap, bottom gap, hinge-side gap, lock-side gap, and the space between the door face and frame face. I also listen for rubbing. I check whether the latch enters the strike plate smoothly. If the latch misses the strike, I do not assume the lock is bad. I check whether the door leaf has dropped or shifted sideways. In door factory assembly, I suggest that teams record the same points for each door. This makes batch inspection more stable.
| What I Check | What It May Mean | What I Do Next |
|---|---|---|
| Top gap is too small on one side | Door leaf may be tilted | I check vertical and lateral alignment |
| Bottom gap is uneven | Door may have dropped or frame may be uneven | I confirm frame and hinge fixing first |
| Door rubs the frame | Depth or side gap may be wrong | I check rubbing position before adjustment |
| Latch does not enter smoothly | Door position may not match the strike | I check side gap and closing height |
| Door feels loose | Screws or hinge seating may be unstable | I check fixing before calibration |
I prefer this method because it separates hinge adjustment from installation errors. It also helps buyers and door factories reduce repeated after-sales claims.
How Do I Understand 3D Hinge Adjustment Direction?
Many adjustment mistakes happen because the screw is turned before the direction is understood. I may move the door the wrong way.
I read 3D hinge calibration as three movements: vertical for top and bottom clearance, lateral for side gaps, and depth for flushness and closing feel3.

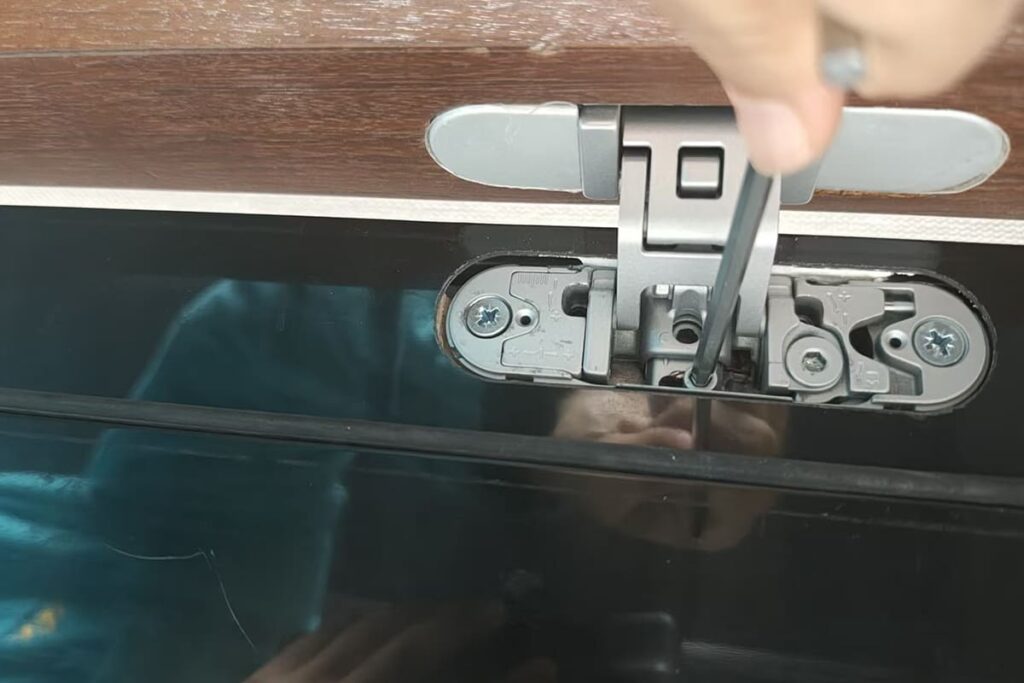
I think about concealed adjustable hinges as a small positioning system. Each direction has a clear job. Vertical adjustment moves the door leaf up or down. I use it when the top or bottom clearance is not correct. Lateral adjustment moves the door leaf toward or away from the hinge side. I use it when the side gap is uneven or when the latch side is too tight. Depth adjustment moves the door face in or out relative to the frame. I use it when the door is not flush, rebounds, or rubs at the frame surface. I never turn all screws at once. I adjust one direction, inspect the result, and then continue.
| 3D Direction | I Use It For | I Avoid Using It For |
|---|---|---|
| Up and down | Top and bottom clearance | Fixing bad drilling height beyond the hinge limit |
| Left and right | Hinge-side and lock-side gaps | Hiding a frame that is not square |
| Front and back | Flushness, rubbing, closing feel | Solving door warping or wrong gasket pressure alone |
I also remind assembly teams to read the product drawing for each hinge model. Adjustment structure can differ by model. The logic is similar, but the screw position and locking method may change. I treat the hinge manual as part of quality control, not as an optional paper.
How Do I Adjust Door Gaps Without Creating New Problems?
A door can look better after one adjustment and still close badly. I need to check movement, not only appearance.
I adjust in small steps. I correct the most obvious gap first, lock the setting, test the door, and then check all other clearances again.

I start with the issue that affects function most. If the door rubs at the top, I check vertical position and tilt first. If the latch side is too tight, I check lateral position. If the door face sits proud or too deep, I check depth. I do not force the door into position. I also do not over-tighten screws as a way to pull the leaf into place. That can damage fixing points or create stress in the hinge body.4 In factory work, I prefer a repeatable process. I ask the team to use the same gap target, the same checking tools, and the same order of adjustment for each door.
| Adjustment Step | My Action | My Control Point |
|---|---|---|
| Step 1 | I identify the main fault | I mark rubbing or uneven gap areas |
| Step 2 | I loosen only the needed locking point | I keep the hinge supported |
| Step 3 | I make a small adjustment | I avoid large movement at one time |
| Step 4 | I retighten and test | I open and close the door several times |
| Step 5 | I inspect all gaps again | I confirm no new problem appears |
I pay special attention to the relationship between gaps. If I raise the door, the latch height may change.5 If I move the door sideways, the lock-side clearance may improve, but the hinge-side gap may become too tight. If I change depth, the door may look flush, but the closing force may feel different. Calibration is not one screw action. It is a controlled balance.
Why Do Non-Handed Adjustable Hinges Matter in Batch Assembly?
Inventory becomes messy when left and right parts are separated. Wrong hinge direction can delay door production and packing.
I value non-handed concealed adjustable hinges because one hinge type can serve left-opening and right-opening doors6, depending on the model design and installation method.

In our customer support work, I often see door factories ask whether a concealed hinge is left-handed or right-handed. Many adjustable concealed hinges are non-handed. This means the same hinge can be used for both left-opening and right-opening doors when the product design supports it. I still confirm the exact model before production because not every hinge in the market is the same. For a factory, non-handed design can reduce inventory pressure7. It can also reduce picking errors in batch assembly. A buyer can plan fewer SKUs and simplify warehouse control. This is useful when a factory makes many door types for different markets.
| Factory Concern | How Non-Handed Hinges Help | My Check Before Order |
|---|---|---|
| Left and right inventory | I can reduce separate stock types | I confirm the model is truly non-handed |
| Batch assembly speed | I can simplify picking and installation planning | I confirm the installation drawing |
| Wrong-part risk | I can reduce left-right matching errors | I train the team on orientation |
| Export packing | I can prepare hardware sets more easily | I match hinge, screws, and accessories |
I also connect non-handed use with calibration. If the same hinge is used across many door directions, the assembly team still needs the same adjustment logic. Vertical, lateral, and depth movement must be checked after installation. Non-handed design simplifies planning, but it does not remove the need for accurate drilling, correct fixing, and final inspection.
How Do I Inspect the Door After Hinge Calibration?
A door may look aligned in one position and fail during use. I need to test the full movement before approval.
I inspect top and bottom gaps, side clearance, flushness, opening smoothness, closing stability, and latch alignment after calibration.

I treat post-adjustment inspection as part of calibration, not as a separate job. I first check the door in the closed position. I look at the top gap and bottom gap. I compare the hinge-side gap and lock-side gap. I then check the door face against the frame face. If the door is flush but feels tight during closing, I keep checking. Visual alignment alone is not enough.8 I open the door slowly and listen for rubbing. I close the door several times. I watch whether the latch enters the strike plate without extra force. I also check whether the door rebounds or swings in an unbalanced way.
| Inspection Point | What I Want to See | What I Recheck If It Fails |
|---|---|---|
| Top and bottom gap | I see stable and even clearance | I recheck vertical adjustment and frame level |
| Side clearance | I see no rubbing on hinge or lock side | I recheck lateral adjustment |
| Door flushness | I see a clean plane with the frame | I recheck depth adjustment |
| Opening movement | I feel smooth movement without scraping | I check hinge fixing and alignment |
| Latch alignment | I see smooth latch entry | I check door height and side position |
In B2B supply, I care about this stage because small inspection gaps can become large after-sales costs. A door factory may ship many doors in one batch. If the calibration method is not stable, complaints may repeat across the whole order. I prefer to set a clear inspection checklist before mass assembly. This helps the buyer, the production team, and the hardware supplier speak the same language.
How Can Proper Calibration Support Longer Door Service Life?
Small looseness can grow over time. Poor hinge alignment can add stress to screws, frames, locks, and the door leaf.9
I use hinge calibration as preventive maintenance because correct alignment can reduce rubbing, looseness, imbalance, and extra load on the door hardware system10.

I do not say that calibration solves every long-term door problem. I also do not say that one adjustment lasts forever. Doors work under real use. Users open them fast, close them hard, and sometimes add loads that the design did not expect. Still, correct calibration gives the door system a better starting point. When the door is aligned, the hinge carries load more evenly11. The latch does not fight the strike plate. The frame does not receive constant rubbing. The surface finish is also less likely to be scratched by contact points.
| Good Calibration Result | Long-Term Value I Expect | Limit I Still Respect |
|---|---|---|
| Even gaps | I reduce rubbing points | I still need correct frame accuracy |
| Stable closing | I reduce lock and latch stress | I still need proper lock installation |
| Better flushness | I improve appearance and sealing feel | I still need correct door and gasket design |
| Smooth movement | I reduce user complaints | I still need the right hinge for door weight |
| Firm fixing | I reduce looseness risk | I still need good screws and material strength |
I see calibration as both correction and prevention. In my work with concealed hinges, I often tell buyers to think about the complete door set. The hinge, lock, frame, door leaf, screws, gasket, and installation accuracy all work together. Adjustable hinges give useful fine control. They do not replace basic production accuracy. When a factory controls both production and calibration, the door feels better and the batch result becomes more consistent.
Conclusion
I calibrate adjustable hinges by diagnosing first, adjusting 3D directions carefully, and inspecting function after every change to support stable door performance.
"[PDF] DIVISION 8 – DOORS & WINDOWS - in.nau.edu", https://in.nau.edu/wp-content/uploads/sites/60/2018/08/Division-8-05.01.15-ek.pdf. A carpentry or building-maintenance manual describes hung-door troubleshooting as involving the frame, door leaf, hinges, and latch/strike relationship, supporting the point that visible unevenness is not necessarily caused by the hinge alone. Evidence role: general_support; source type: education. Supports: A neutral carpentry or building-maintenance source should support that uneven gaps and poor closing can arise from several installation or component conditions, not only hinge adjustment.. Scope note: This would support the diagnostic principle generally rather than proving the cause of any specific door defect. ↩
"How to Adjust in 3D - Tectus Hinges", https://www.tectushinges.com/how-to-adjust-in-3d. Technical documentation for adjustable concealed hinges specifies finite adjustment ranges for hinge movement, supporting the statement that calibration is limited by the hinge design rather than unlimited corrective capacity. Evidence role: definition; source type: institution. Supports: A technical hardware guide or standard should document that adjustable hinges have specified ranges of movement and must be installed within those tolerances.. Scope note: Such sources usually describe particular hinge classes or models, so the support is contextual unless the cited source covers the exact hinge model discussed. ↩
"How to Adjust in 3D - Tectus Hinges", https://www.tectushinges.com/how-to-adjust-in-3d. An architectural-hardware technical guide defines three-dimensional hinge adjustment as vertical, lateral, and depth movement, supporting the article's mapping of these directions to clearance, side gap, and flushness checks. Evidence role: definition; source type: institution. Supports: A technical or architectural-hardware source should define 3D hinge adjustment as height/vertical, side/lateral, and depth/in-out adjustment.. Scope note: The cited source may use cabinet or door-hardware terminology that is equivalent but not worded exactly the same as the article. ↩
"Optimization of Bolted Joints: A Literature Review", https://www.mdpi.com/2075-4701/13/10/1708. Fastener-engineering literature explains that excessive tightening torque can strip threads, crush the substrate, or overstress joint components, supporting the warning that over-tightening hinge screws may damage fixing points or stress the hinge assembly. Evidence role: mechanism; source type: research. Supports: A fastener or wood-joint engineering source should support that excessive tightening torque can strip threads, damage the substrate, or impose harmful stress on a mechanical joint.. Scope note: The source may address screw joints generally rather than concealed door hinges specifically. ↩
"Iark Dutch Door: Repair, Installation, And More - Grinnell CS", https://cs.grinnell.edu/lunar-note/iark-dutch-door-repair-installation-and-more-1764797300. Door-installation guidance explains that latch operation depends on the relative vertical position of the latch bolt and strike plate, supporting the statement that raising the door can change latch alignment. Evidence role: mechanism; source type: education. Supports: A door-installation or maintenance source should support that changing door height affects how the latch meets the strike plate.. Scope note: This supports the geometric relationship generally and does not quantify the amount of height change caused by a particular hinge adjustment. ↩
"[PDF] SECTION 087111 - DOOR HARDWARE (SCHEDULED ... - USC FPM", https://fpm.usc.edu/wp-content/uploads/2021/11/087102-USC-HSC-door-hardware-Guide-Specification_1.pdf. An architectural-hardware glossary defines non-handed hardware as hardware not limited to one door hand, supporting the claim that a properly designed non-handed hinge may serve both left-opening and right-opening applications. Evidence role: definition; source type: institution. Supports: An architectural-hardware glossary or guide should define non-handed hardware as usable for either hand or swing where designed accordingly.. Scope note: The definition does not imply that every concealed adjustable hinge is non-handed; applicability remains model-specific. ↩
"SKU Rationalization: Cutting Complexity Without Hurting Sales", https://www.mrpeasy.com/blog/sku-rationalization/. Operations-management research links SKU proliferation with greater inventory and warehouse-management complexity, providing contextual support for the claim that using one non-handed hinge instead of separate left- and right-handed versions can reduce inventory pressure. Evidence role: general_support; source type: research. Supports: A supply-chain or operations-management source should support that fewer SKUs can reduce inventory complexity, carrying burden, or picking complexity.. Scope note: The evidence would support the inventory mechanism generally, not measure the savings for a specific door factory. ↩
"Chapter 4: Entrances, Doors, and Gates - Access-Board.gov", https://www.access-board.gov/ada/guides/chapter-4-entrances-doors-and-gates/. A building-maintenance inspection guide treats door operation, rubbing, swing behavior, and latch/strike engagement as inspection items, supporting the statement that visual alignment alone is insufficient. Evidence role: expert_consensus; source type: government. Supports: A government or institutional maintenance guide should support that door inspections include operation, rubbing, swing, and latch/strike function in addition to visual condition.. Scope note: Such guidance is usually written for general door maintenance and may not specifically address concealed adjustable hinge calibration. ↩
"How To Fix A Door That Won't Latch",
. Door-hardware maintenance literature explains that hinge or door misalignment can create binding and abnormal loads at hinges, fasteners, frames, and latch points, supporting the claim that poor alignment adds stress to the door system. Evidence role: mechanism; source type: institution. Supports: A door-hardware or maintenance source should support that misalignment can transfer loads to screws, frames, latches, and the door leaf.. Scope note: The source may describe abnormal loading qualitatively rather than provide measured stress values for each component. ↩"How To Fix a Sagging Door that's Rubbing or Won't Close!!! - YouTube",
. Architectural-hardware maintenance guidance identifies proper door and hinge alignment as a means of reducing binding, rubbing, and abnormal hardware loading, supporting the article's preventive-maintenance claim. Evidence role: general_support; source type: institution. Supports: A maintenance or architectural-hardware source should support that proper door and hinge alignment helps prevent binding, rubbing, and abnormal load on hardware.. Scope note: This supports the general maintenance rationale and may not prove long-term service-life gains for every installation. ↩"Hinge Load Capacity: How to Calculate It - Weber Knapp Blog", https://blog.weberknapp.com/hinge-load-capacity-calculation. Engineering analysis of hinged-door supports shows that geometry and alignment influence reaction forces at hinges, supporting the claim that correct alignment helps the hinge set carry the door load more evenly. Evidence role: mechanism; source type: research. Supports: An engineering source should support that hinge alignment affects how door weight and reaction forces are distributed among hinges.. Scope note: A mechanics source may model idealized hinges and doors, so field conditions such as frame deformation and installation quality still affect actual load distribution. ↩
