
Where To Put Hinges On Door?
A hinge placed in the wrong position can make a good door look bad, sag early, and create costly rework in bulk production.
For concealed hinges, placement depends on door height, door weight, hinge model, door structure, opening style, and frame groove design1. A common reference for regular interior doors is near the top and bottom, often around 250mm from each corner2, but this must be checked against the actual project.

I often see buyers ask for one simple hinge position. I understand why. A fixed number looks easy for drawings, quotations, and production control. But I do not treat concealed hinge placement as one fixed rule. I treat it as a load, alignment, and machining decision. If the position is wrong, the problem may not appear in the sample room. It may appear after painting, after packing, after installation, or after the customer opens and closes the door every day. That is where the real cost begins.
Should I Use Two Concealed Hinges On A Regular Interior Door?
A regular interior door can still fail if the hinge position ignores door size, hinge load rating, and machining accuracy3.
Two concealed hinges are often used on moderate-weight interior swing doors or wooden doors below about 2200mm4. A common reference is to place one hinge around 250mm from the top corner and one hinge around 250mm from the bottom corner, but this is not a universal standard.

What I Check Before I Accept A Two-Hinge Layout
When I review a two-hinge layout in our factory work, I first check whether the door is really a regular interior door. I do not only look at the height. I also look at the door core, the surface material, the frame design, and the hinge model. A light hollow-core door and a dense solid wood door may have the same height, but they do not give the hinge the same load. I also check whether the hinge has enough adjustment range. A concealed hinge usually needs fine adjustment after installation. If the position is too close to a weak area of the door leaf, the screw holding power may be poor.5
| Check Item | What I Look For | Why It Matters |
|---|---|---|
| Door height | Usually below about 2200mm for a basic two-hinge reference | Taller doors create more leverage |
| Door weight | Moderate weight, not heavy solid wood | Weight affects sagging risk |
| Hinge model | Load rating and adjustment design | Not all concealed hinges carry the same load |
| Door structure | Strong enough edge material | Screws need stable holding power |
| Frame condition | Accurate groove and flat contact surface | The hinge must sit flush |
I use the 250mm reference as a starting point, not as a final answer. If the door factory has its own tested standard, I respect it. If the project has a special frame, I ask for drawings before I suggest hinge positions. I have seen cases where the hinge number looked correct, but the mortise position did not match the frame. The door could close, but the gaps were not even. That small error became a large complaint after batch delivery.
Where Should The Third Concealed Hinge Go On A Tall Or Heavy Door?
A tall or heavy door puts more stress on the upper hinge area6, so two hinges may not control sagging well enough.
For doors higher than about 2200mm or heavier doors, three concealed hinges are often safer. The third hinge is commonly placed below the top hinge, often around 300–450mm away7, so it can share load and reduce deformation risk.

Why I Place Extra Support Near The Top
I usually pay more attention to the top part of a heavy door. Gravity pulls the door down, and the door leaf creates leverage from the hinge side to the lock side. The upper hinge area carries a strong part of that force. This is why the third concealed hinge is often placed below the top hinge, not exactly in the center. The aim is to support the most stressed zone and reduce the chance of the lock side dropping over time.
| Door Condition | Common Hinge Quantity | Common Third Hinge Idea | Main Purpose |
|---|---|---|---|
| Standard interior door | 2 | Not always needed | Basic support |
| Door over about 2200mm | 3 | Below top hinge | Control leverage |
| Solid wood door | 3 or more if needed | Near upper load area | Reduce sagging |
| Heavy acoustic or fire-style door | Project-based | Follow tested design | Match load and compliance needs |
| Wide or special door | Project-based | Based on hinge rating | Control twist and gap movement |
I do not tell a buyer that three hinges solve every heavy-door problem. The hinge model must match the door weight. The screw type must match the door material. The frame must also hold the hinge well. If one part is weak, the extra hinge may only hide the problem for a short time. In one project discussion, I remember a buyer asking why the sample door looked fine with two concealed hinges. I asked him to check the final production door weight after surface treatment and accessories8. The final door was heavier than the sample. That change made the third hinge necessary. This is why I always ask for real weight, not only nominal door size.
How Should I Position Concealed Hinges On An Invisible Door?
An invisible door can lose its clean look if the hinge line is not straight, even when the door can open and close.
For invisible doors, a common reference is about 150mm down from the top and 150mm up from the bottom9. Larger or heavier invisible doors often add another hinge around 450mm from the top. All hinge centers should stay on the same vertical line.10

Why Visual Alignment Matters More On Invisible Doors
Invisible doors are less forgiving than regular doors. The customer often expects a flat wall effect, narrow gaps, and clean closing lines. If the concealed hinge centers are not on the same vertical line, the door leaf may twist during movement. The door may still open, but the reveal line can become uneven. The lock side may rub. The top gap may look different from the bottom gap. These problems are easy for the end user to see.
| Alignment Point | Good Practice | Risk If Ignored |
|---|---|---|
| Top hinge position | Use a clear reference, such as about 150mm from top on some designs | Top gap may look uneven |
| Bottom hinge position | Keep a matching lower reference, such as about 150mm from bottom | Bottom corner may rub |
| Extra hinge | Often around 450mm from top for larger or heavier doors | Door may sag or twist |
| Hinge center line | Keep all centers on one vertical line | Door movement may bind |
| Wall and frame plane | Check before cutting | Invisible effect may fail |
I treat invisible door hinge placement as a visual and mechanical task. The hinge must carry the door, but it must also protect the wall-line effect. This is why I ask for the finished wall thickness, frame profile, door leaf thickness, and opening direction. I also care about paint and veneer thickness. A concealed hinge that is flush before surface finishing may become too tight after finishing if the allowance is not controlled. In factory production, this small detail can decide whether the installer needs to repair the door on site. I do not like leaving this to chance. I prefer to confirm the hinge model, groove depth, and vertical reference line before mass cutting begins.
What Should I Do For System Doors Or Special-Profile Doors?
A system door can look simple outside, but its hinge position may be controlled by hidden grooves, profiles, and factory reference lines.
For system doors and special-profile doors, hinge placement should follow the reserved groove, factory reference line, or system supplier’s standard. The key is not only distance from the edge. The hinge axis, frame groove, door groove, and opening clearance must align.11

Why The Groove Can Be More Important Than The Number
In system doors, the hinge position is often not decided by a simple top and bottom distance. The aluminum profile, wooden frame structure, gasket position, and decorative cover may already define where the hinge can sit. If the hinge body does not match the reserved groove, the hinge may not open freely. If the axis is wrong, the door may hit the frame or fail to reach the expected opening angle. If the groove depth is wrong, the door may stand proud or close too tightly.
| System Door Factor | What I Confirm | Reason |
|---|---|---|
| Reserved groove | Width, height, and depth | The hinge body must fit |
| Hinge axis | Position against frame and leaf | Opening clearance depends on it |
| Frame profile | Shape and wall thickness | Screws and hinge body need support |
| Door leaf groove | Same line as frame groove | Misalignment causes twisting |
| Opening angle | Required by project | Hinge model must allow it |
| Gasket and seal | Compression space | Door should close without binding |
I have worked with buyers who sent only a hinge photo and asked if it could fit a system door. My answer is usually that I need the profile drawing. A concealed hinge is not only a metal part. It is part of the door system. The frame groove, leaf groove, screw position, and clearance all work together. If the door supplier already has a system standard, I follow that first. If the buyer wants an ODM hinge or a matching hinge solution, I need drawings, samples, or exact measurements. This is the safest way to avoid rework, especially when the order is for hundreds or thousands of doors.
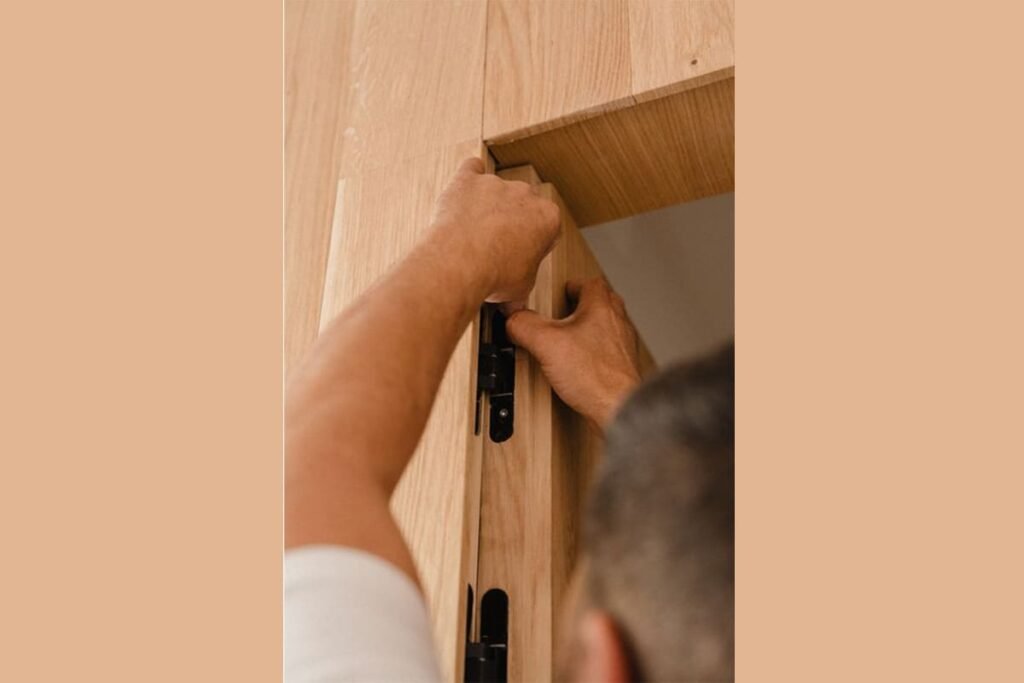
How Accurate Should The Mortising Be For Concealed Hinges?
A concealed hinge needs more accurate cutting than a normal visible hinge, and poor mortising can ruin a correct hinge layout.
The mortise depth should match the hinge body or leaf thickness, and the hinge should sit flush with the door and frame surface.12 If the slot is too shallow or too deep, the door may bind, show uneven gaps, or close poorly.

Why Cutting Depth Affects Door Gaps
Concealed hinges hide inside the door and frame, so the machining area is deeper and more detailed. A small error in depth or position can move the door leaf out of its correct plane. If the groove is too shallow, the hinge may stand proud. The door may not close fully. If the groove is too deep, the hinge may sink. The door gap may become too large on one side. If the left and right grooves are not aligned, the hinge can work under stress. That stress may later become noise, loose screws, or early wear.
| Mortising Detail | Correct Result | Common Problem If Wrong |
|---|---|---|
| Slot depth | Hinge sits flush | Binding or visible gap |
| Slot width | Hinge body fits without force | Body may deform or shift |
| Slot length | Leaves space for hinge movement | Hinge may rub during opening |
| Screw hole position | Screws pull straight | Hinge may move under load |
| Frame and leaf line | Axis stays aligned | Door may twist or sag |
I always remind customers that concealed hinges need stable machining. A good hinge cannot fix a bad slot. In bulk production, this point becomes more serious. One sample may be adjusted by a skilled worker, but mass production needs repeatable cutting. I suggest using clear templates, CNC data, or fixed jigs when the order requires stable quality. I also suggest checking the hinge after surface finishing, not only before finishing. Paint, veneer, powder coating, or wrapping can change the final fit. When the hinge sits flush and the axis is correct, the door movement feels clean. When the mortise is wrong, the customer often blames the hinge first, even when the real cause is machining.
How Do I Decide The Final Concealed Hinge Position Before Production?
A hinge layout that looks fine on a drawing can still create problems if production does not check the real door condition.
I decide final concealed hinge placement by checking door height, door weight, hinge model, hinge quantity, door structure, frame groove, opening direction, surface finish, and project requirements. The safest position is the one that matches both the hinge capacity and the door system.

My Practical Factory-Side Checklist
Before I confirm a hinge position for a buyer, I prefer to work through a simple checklist. I do this because hinge position affects cost, quality, installation speed, and after-sales risk. The buyer may only ask where to put the hinge. But I know the real question is whether the door can stay aligned after production, shipping, and use. The best answer must reduce complaints.
| Step | Question I Ask | Decision Impact |
|---|---|---|
| 1 | What is the finished door height? | It affects hinge quantity and spacing |
| 2 | What is the finished door weight? | It affects hinge load selection |
| 3 | What is the door leaf material? | It affects screw holding strength |
| 4 | What is the frame profile? | It affects groove design and axis |
| 5 | What hinge model is used? | It affects dimensions and adjustment |
| 6 | What opening style is required? | It affects clearance and movement |
| 7 | What finish will be applied? | It affects final flush fit |
| 8 | Is this sample or bulk production? | It affects jig and QC control |
I also ask the buyer to separate reference numbers from final standards. A number like 250mm, 150mm, 300–450mm, or 450mm can help the design team start a discussion. It should not replace product testing or system confirmation. If the project is a normal interior door, the common reference may work well. If the project is a heavy door, invisible door, or system door, the final layout should come from the hinge model, the door drawing, and the production method. This is how I reduce risk for door factories, hardware brands, and wholesalers who need stable repeat orders, not only one attractive sample.
Conclusion
I place concealed hinges by door condition, not by one fixed number. Good positioning protects alignment, load capacity, production accuracy, and customer trust.
"How to Choose & Install Concealed Hinges | Cabinet Door Series ...",
. Architectural-hardware guidance treats hinge positioning as a function of door dimensions, mass, hinge specification, and frame or leaf construction, supporting the use of project-specific placement rather than a universal concealed-hinge distance. Evidence role: expert_consensus; source type: institution. Supports: A technical or standards-based source should support that hinge placement must account for door size, mass, hinge capacity, leaf construction, opening clearance, and frame geometry.. Scope note: Such sources may describe general hinge selection and installation principles rather than the exact concealed-hinge dimensions used in this article. ↩"How to Fit Perfect Door Hinges - YouTube",
. Door-installation and architectural-hardware references commonly give top and bottom hinge locations as measured offsets from the door ends, which contextualizes the article’s use of approximately 250 mm as a practical reference dimension. Evidence role: general_support; source type: institution. Supports: A door-manufacturing or architectural-hardware reference should document that hinge positions near 250 mm from the top and bottom edges are used as a common layout reference for some interior doors.. Scope note: The cited source may support common hinge-offset practice generally and may not establish 250 mm as a universal or mandatory standard for concealed hinges. ↩"How to Choose a Commercial Door Hinge | McKinney", https://www.mckinneyhinge.com/content/mckinney/us/en/resource-library/knowledge-center/blog/blog-post.aehdynamic-how-to-choose-a-commercial-door-hinge-633c8974d5c7b1003db5d8e9_mckinney.html. Mechanical and architectural-hardware sources describe door-hinge performance as dependent on door mass, geometric loading, hinge capacity, and installation tolerances, supporting the article’s warning that a nominal two-hinge layout may be inadequate when these factors are ignored. Evidence role: mechanism; source type: research. Supports: A source should explain that hinge capacity, door dimensions, and installation tolerances affect hinge loading, alignment, and long-term door performance.. Scope note: The evidence is likely to support the underlying mechanics rather than directly testing the exact two-concealed-hinge scenario described. ↩
"How to Choose the Right Door Hinges for My Home - Design House", https://www.todaysdesignhouse.com/blog/how-do-i-select-the-right-door-hinges-for-my-home?srsltid=AfmBOopIhYzLHPJme-hDVF2voXN8iNOxE4cr0YsK3ox_4f9HDOTJxflT. Door-hardware guidance commonly links hinge quantity to door height and weight, supporting the article’s treatment of two hinges as a reference condition for standard or moderate-height interior doors. Evidence role: general_support; source type: institution. Supports: A relevant source should show that hinge quantity is commonly increased as door height and weight increase, with two hinges used on many standard-height interior doors.. Scope note: The source may not define 2200 mm as a strict cutoff, so it should be cited only as contextual support for the threshold. ↩
"Screw-holding, internal bond, and related properties of ...", https://www.fpl.fs.usda.gov/documnts/pdf1989/mcnat89c.pdf. Wood-fastener studies show that screw withdrawal resistance varies with substrate density, structure, and placement conditions, supporting the claim that hinge screws installed in weak door-leaf material may have poor holding power. Evidence role: mechanism; source type: paper. Supports: A wood-science or fastener-performance source should support that screw withdrawal strength depends on substrate density, edge condition, and material integrity.. Scope note: The evidence may address screw withdrawal in wood or engineered wood generally rather than concealed-hinge screws in a specific door product. ↩
"Forces on a door hinge - FineWoodworking", https://www.finewoodworking.com/forum/forces-on-a-door-hinge?srsltid=AfmBOopEWgobIlOuZF-LSfSco1sfSYGamcYPeRUZtHCXap3X8SW5H4Xl. Engineering mechanics explains that the weight of a door creates a moment about the hinge line and corresponding reaction forces at the hinges, which contextualizes why taller or heavier doors can impose greater load on the upper hinge region. Evidence role: mechanism; source type: education. Supports: A physics or engineering source should explain that a door’s weight and width create moments that must be resisted by hinge reactions, with significant forces at the upper hinge.. Scope note: This supports the mechanical principle but does not quantify the stress distribution for every concealed-hinge model. ↩
"How to Choose & Install Concealed Hinges | Cabinet Door Series ...",
. Architectural-hardware installation references often place an additional hinge closer to the upper hinge on tall or heavy doors, supporting the article’s statement that the third hinge is used near the upper load area to improve support. Evidence role: expert_consensus; source type: institution. Supports: A hardware-installation reference should support placing an additional hinge closer to the top hinge on taller or heavier doors to improve support.. Scope note: The exact 300–450 mm interval may vary by jurisdiction, door type, hinge model, and manufacturer testing. ↩"What to use as weight for a door stop? - Facebook", https://www.facebook.com/groups/418432931904794/posts/2584203991994333/. Door-design references calculate or specify door weight according to core, facing, finish, glazing, and hardware components, supporting the article’s distinction between sample weight and final production weight. Evidence role: general_support; source type: institution. Supports: A source should support that finished door weight depends on core material, facings, finishes, hardware, and accessories rather than nominal size alone.. Scope note: The source may not document the author’s specific project example, only the general basis for weight variation. ↩
"How to Choose & Install Concealed Hinges | Cabinet Door Series ...",
. Flush-door and concealed-hinge installation guidance may specify measured top and bottom offsets for hinge mortises, contextualizing the article’s use of approximately 150 mm as a reference dimension for some invisible-door layouts. Evidence role: general_support; source type: institution. Supports: A source should support that some flush or invisible-door systems use relatively short top and bottom offsets for concealed hinges.. Scope note: This is likely system-specific; the citation should not imply that 150 mm is a universal invisible-door standard. ↩"Why is my interior door binding after hinge replacement?", https://www.facebook.com/groups/woodworkingforbeginner/posts/3397682640386337/. Mechanical descriptions of hinges define door motion around a common hinge axis, supporting the requirement that multiple hinge centers be aligned vertically to avoid binding or distortion during swing. Evidence role: mechanism; source type: education. Supports: A source should support that hinges must share an aligned rotational axis for smooth movement and to avoid binding.. Scope note: The source may explain hinge kinematics generally rather than invisible-door installation specifically. ↩
"Standard Door Installation Clearances and Dimensions ... - Facebook", https://www.facebook.com/61554977615841/posts/standard-door-installation-clearances-and-dimensionsthis-technical-illustration-/122268130742165920/. Hinge-kinematics and architectural-door references show that the hinge axis and adjacent frame or leaf geometry determine swing clearance, supporting the article’s claim that grooves and axis placement must be coordinated in system doors. Evidence role: mechanism; source type: research. Supports: A source should support that hinge axis position and surrounding frame or leaf geometry determine clearance and opening behavior.. Scope note: The support is contextual and may not cover every proprietary system-door profile. ↩
"How to Choose & Install Concealed Hinges | Cabinet Door ...",
. Woodworking and door-hardware installation references describe hinge mortising as cutting a recess to the hinge’s thickness or body dimensions so the hardware sits flush with the door and frame surfaces. Evidence role: definition; source type: institution. Supports: A source should support that hinge mortises are cut to match hinge dimensions and allow the hinge leaf or body to sit flush with adjacent surfaces.. Scope note: The cited guidance may apply to hinges broadly and should be used to support the mortising principle rather than exact tolerances for every concealed hinge. ↩
