
How does the geometry of doors with hidden hinges work?
I often see good door designs fail at the hinge area. The gap rubs, the opening feels tight, and the project loses time.
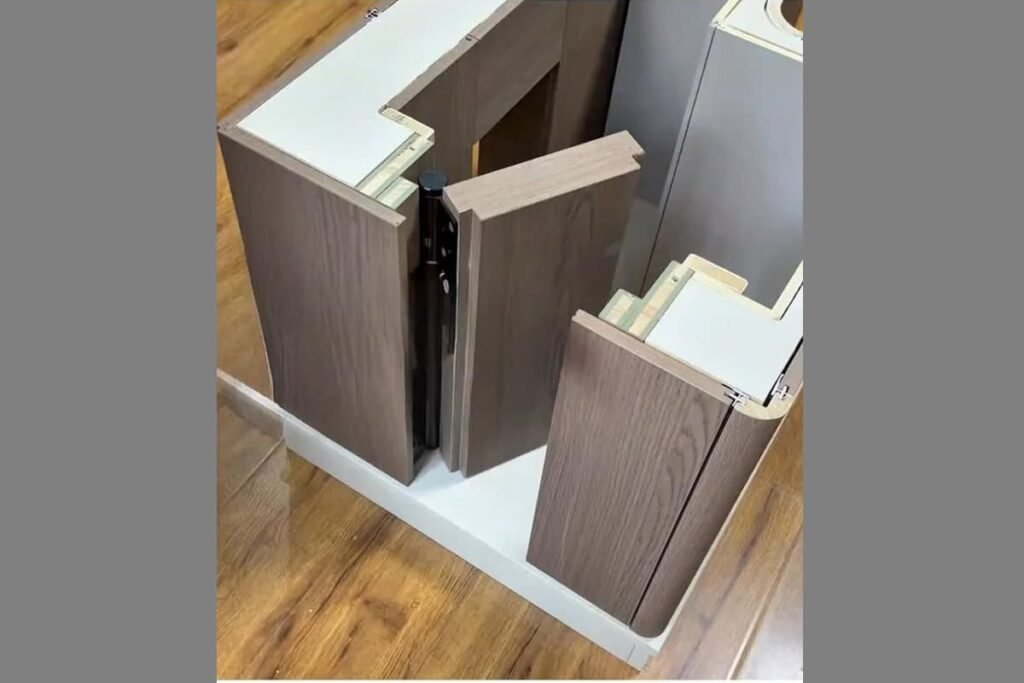
A hidden hinge works through internal linkage geometry.1 I do not treat it as a hidden butt hinge. Its arms and pivot points guide the door through rotation, small side movement, and clearance control so the door leaf can open without hitting the frame.

I learned this lesson on the production side, not from a drawing alone. When I match a concealed hinge to a door, I first check door thickness, door weight, required opening angle, door gap, mortise depth, frame shape, and installation method. If one item is wrong, the hinge may still look correct on paper, but the door may not move correctly after assembly.
I see this mistake often. A buyer compares a hidden hinge with a butt hinge, then expects the same swing behavior inside the door.
A butt hinge turns around one visible pin near the door edge. A hidden hinge uses internal arms, several pivot points, and a hinge body inside the door and frame.2 I use it to create a guided movement path, not only to hide metal.

The visible axis and the internal linkage are different
A traditional butt hinge is easy to understand. I can see the pin. I can see the axis. The door leaf rotates around that axis in a clear arc.3 This works well for many doors, but it also means the hinge knuckle stays visible.
A concealed hinge works in another way. I place one hinge body into the door leaf. I place the other hinge body into the frame. The arms connect both bodies. These arms do not only spin like one simple pin. They open in a set path. Each pivot point changes the path of the door edge.4
| Hinge type | Main movement | Axis position | Clearance behavior | Main design concern |
|---|---|---|---|---|
| Butt hinge | Simple rotation | Visible near edge | Depends on leaf swing arc | Pin position and leaf edge |
| Hidden hinge | Guided compound motion | Inside hinge body | Controlled by linkage path | Arm layout, pivot layout, mortise space |
I do not explain a hidden hinge as a normal hinge placed deeper in the door. That idea causes wrong product selection. The hidden hinge must create enough movement inside a tight mortised space. It must also keep the door edge away from the frame. This is why I always ask for drawings before mass orders. A small change in frame rebate, door thickness, or gap can change the real movement.
What compound motion does a concealed hinge create?
I have seen buyers focus only on the opening angle. That is risky. The door also needs to shift enough to clear the frame.
A concealed hinge creates compound motion. The door rotates, and it also moves slightly in space during the swing.5 I use this combined movement to help the door leaf avoid rubbing against the frame edge.

Rotation plus small displacement creates clearance
When I test a concealed hinge on a sample door, I watch the edge path closely. I do not only check whether the door reaches the required angle. I also check whether the door edge touches the frame, whether the reveal stays acceptable, and whether the movement feels smooth.
The door does not open as a flat 2D shape on a drawing. It moves in real space. The arms pull and guide the leaf. The leaf can move outward, inward, and sideways by small amounts while it rotates. These small movements matter. They create the clearance that makes the hidden hinge useful.6
| Movement part | What I check | Why it matters |
|---|---|---|
| Rotation | The door reaches the required opening angle | The user must open the door enough for daily use |
| Lateral shift | The door edge moves away from the frame area | The door should not rub the frame |
| Inward or outward movement | The leaf follows the hinge path smoothly | The door should not bind during opening |
| Gap behavior | The reveal stays acceptable | The finished door should look clean |
I often use a simple test. I mount the hinge in a real door and frame sample, then I open it slowly. I look at the hinge side gap from the first few degrees to the full opening angle. Many problems appear early in the swing. A product can reach a wide opening angle in theory, but it can still fail if the early movement hits the frame. This is why I care about the path, not only the final angle.
How do link arms and pivot positions affect the door path?
I sometimes receive one question: “Can I get a bigger angle by using longer arms?” I answer carefully because the real design is not that simple.
Link-arm length and pivot-pin position both affect the door path, opening angle, and gap behavior.7 I treat them as interacting parts. I also consider hinge body size, door thickness, and frame geometry.

The hinge path comes from a group of design choices
In production, I look at the link arms as one part of a system. The arm length changes how far the door can travel and how the leaf shifts during movement. The pivot-pin position changes the curve of that movement.8 The hinge body shape limits where those arms can sit. The mortise space limits how large the body can be. The door and frame decide how much room the hinge has to move.
| Design factor | Effect on geometry | Risk if matched poorly |
|---|---|---|
| Link-arm length | Changes movement range and path shape | The door may not clear the frame |
| Pivot-pin position | Changes the swing curve and leaf shift | The gap may close too early |
| Hinge body size | Gives space for arms and internal movement | The hinge may not fit the door |
| Door thickness | Limits mortise depth and body width | The door leaf may become weak |
| Frame rebate | Affects edge clearance | The door may hit the stop or frame |
I avoid saying that arm length alone decides the opening angle. That statement is too simple. A longer arm can help in some designs, but it may also need more internal space. It may change the pressure on pivots. It may need a different body structure. It may also be useless if the frame blocks the door path.
When I discuss a new hinge with a door factory, I ask for the required opening angle first. Then I ask for the section drawing. The drawing tells me whether that angle is realistic with the available space. The answer should come from the full geometry, not from one single hinge part.
Why do door thickness, mortise depth, and frame space matter so much?
I have seen beautiful hidden hinge samples fail because the door did not have enough material and space. The hinge needs a home before it can work.
Door thickness, mortise depth, hinge body size, and frame space decide whether the concealed hinge can be embedded correctly.9 I need enough room for the hinge body, screw fixing, arm movement, and clearance path.

The installation space must support movement and fixing
A concealed hinge needs two accurate mortises. One mortise is in the door leaf. One mortise is in the frame. I need these cavities to fit the hinge bodies, but I also need the surrounding material to remain strong. If the mortise is too deep or too close to the edge, the door or frame may lose fixing strength.10 If the mortise is too shallow, the hinge body may sit proud, and the door may not close flush.
| Installation item | What I confirm | Why I confirm it |
|---|---|---|
| Door thickness | The leaf can accept the hinge body | The hinge must fit without weakening the door |
| Mortise depth | The body sits correctly inside the leaf and frame | The door must close cleanly |
| Frame space | The hinge body and arms have room to move | The door must open without collision |
| Screw position | Screws have enough holding material | The hinge must stay stable |
| Door gap | The reveal matches the hinge path | The leaf must not rub |
I also separate fit from strength. A hinge may fit into a mortise, but that does not automatically mean it can carry the door. Load capacity depends on hinge size, material, internal structure, screw fixing, door weight, and real test data from the specific product. I do not guess this from depth alone.
In my factory work, I prefer to review the door section before recommending a hinge. I want to know if the door is timber, metal, aluminum profile, or another structure. I want to know the frame design. I want to know if the customer needs adjustment after installation. These details decide whether the hinge will work smoothly in real production.
I do not like choosing concealed hinges only by photo. The photo shows the product shape, but it does not show the movement path inside the door.
I usually check door thickness, door weight, opening angle, door gap, mortise depth, frame section, finish need, certification need, and installation method before selection. This lowers the risk before sample making or bulk ordering.

A practical selection process prevents rework
When a buyer sends me a project, I try to turn the door problem into a clear checklist. This helps both sides. It also prevents the common issue where a hinge is ordered, received, and rejected only after the door factory starts machining.
| Checkpoint | Information I request | Reason |
|---|---|---|
| Door thickness | Actual thickness and tolerance | I need to confirm hinge body fit |
| Door weight | Leaf weight or estimated weight | I need to match hinge size and test data |
| Opening angle | Required maximum angle | I need to check movement path |
| Door gap | Planned gap at hinge side and lock side | I need to confirm clearance |
| Frame drawing | Section drawing with rebate and stop | I need to check collision risk |
| Mortise method | CNC, router, or manual machining | I need to consider installation accuracy |
| Certification | CE or fire-rated requirement if needed | I need to match the right product line |
| Finish | Stainless steel, zinc alloy, or surface finish need | I need to keep batch appearance consistent |
I also ask whether the door needs 3D adjustment. Many concealed hinges have adjustment for height, side, and depth. This adjustment is useful because real doors and frames have tolerances.11 I do not treat adjustment as a way to fix a wrong hinge selection. Adjustment helps fine tuning. It does not change the basic geometry.
For bulk orders, I prefer sample testing before mass production. A sample test helps the door factory confirm machining, closing feel, reveal, and final look. It is much cheaper to change a hinge model at the sample stage than after hundreds or thousands of doors are cut.
How does a 3D hydraulic concealed hinge relate to hinge geometry?
I hear another common question from buyers. They ask if hydraulic soft closing changes the hinge geometry. I answer that it is a different function.
The linkage controls the door path. The hydraulic or spring structure controls closing speed and absorbs energy.12 I treat soft closing as an added damping function, not as the main geometry of the concealed hinge.

Geometry guides movement, while damping controls closing feel
A 3D hydraulic concealed hinge may include several functions in one product. The concealed linkage guides the door movement. The 3D adjustment helps the installer correct the final door position. The hydraulic or spring system makes the closing action softer and quieter. These functions work together, but they are not the same thing.
| Function | What it does | What it does not do |
|---|---|---|
| Linkage geometry | Guides rotation and displacement | It does not mainly absorb closing energy |
| 3D adjustment | Fine tunes height, side, and depth | It does not replace correct hinge selection |
| Hydraulic damping | Slows closing and reduces impact | It does not decide the whole door path |
| Spring action | Helps return or close the door in some designs | It does not remove the need for clearance |
I separate these topics when I explain a product. If a door rubs the frame, I first check geometry, mortise accuracy, gap, and frame design. I do not blame the hydraulic part first. If a door closes too fast or too loudly, I then check the damping or spring function.
This separation helps buyers make better decisions. A project may need a standard concealed hinge with clean geometry. Another project may need a 3D hydraulic concealed hinge because the user wants a softer closing feel. Both still need correct door and frame matching. Soft closing cannot save a bad clearance path.
Conclusion
I treat hidden hinge geometry as guided 3D movement. I check the full door system first, then I choose the hinge.
"Tectus Hinges: The Most Comprehensive Concealed Hinge System", https://www.tectushinges.com/. This source provides a detailed explanation of how concealed hinges utilize internal linkage geometry, including arms and pivot points, to guide door movement and control clearance. Evidence role: mechanism; source type: education. Supports: the mechanical principles and operation of concealed hinges based on internal linkage geometry. ↩
"A guide to butt hinges | Essentra Components US", https://www.essentracomponents.com/en-us/news/solutions/access-hardware/a-guide-to-butt-hinges?srsltid=AfmBOooEmnHgx5BIHGTmulX5Zaf5d9mP4pCR-EEXtb3GIU24FSJLjyVf. This source differentiates the mechanical operation of butt hinges, which rotate around a single visible pin, from concealed hinges, which utilize internal arms and multiple pivot points for complex movement. Evidence role: mechanism; source type: education. Supports: the fundamental mechanical differences between butt hinges (single pivot) and concealed hinges (multi-pivot linkage systems). ↩
"Types, Uses, Features and Benefits of Butt Hinges - IQS Directory", https://www.iqsdirectory.com/articles/hinges/butt-hinges.html. This source explains the basic kinematic movement of a door leaf when operated by a traditional butt hinge, detailing its rotation around a single, visible axis. Evidence role: mechanism; source type: education. Supports: the kinematic principle of a butt hinge, where the door leaf rotates along a single, clear arc around a fixed axis. ↩
"Kinematics & hinges with multiple pivot joints - kabkin.com", https://kabkin.com/en/products/category/kinematics-with-multiple-swivel-joints/. This source details the kinematic effect of multiple pivot points in a linkage system, explaining how each pivot contributes to shaping the overall movement path of the door edge in a concealed hinge. Evidence role: mechanism; source type: education. Supports: how the individual pivot points in a multi-linkage concealed hinge system collectively determine and alter the door's movement path. ↩
"Invisible Door Hinge Design Explained This animation ... - Instagram", https://www.instagram.com/reel/DZGQp-_iDZz/?hl=en. This source defines compound motion in the context of concealed hinges, explaining how it involves both rotational movement and subtle spatial displacement of the door leaf during operation. Evidence role: definition; source type: education. Supports: the definition and characteristics of compound motion as it applies to concealed hinges, encompassing both rotational and spatial displacement components. ↩
"How to Choose & Install Concealed Hinges | Cabinet Door Series ...",
. This source explains how the specific small outward, inward, and sideways movements enabled by concealed hinges are fundamental to creating the necessary clearance for the door leaf to operate without friction against the frame. Evidence role: mechanism; source type: research. Supports: the functional importance of small, multi-directional displacements in concealed hinge design for achieving adequate door-to-frame clearance and preventing rubbing. ↩"Four-bar linkage - Wikipedia", https://en.wikipedia.org/wiki/Four-bar_linkage. This source details the kinematic relationship between link-arm length and pivot-pin position in multi-bar linkages, explaining their combined influence on the resulting movement path, opening angle, and gap behavior of a door. Evidence role: mechanism; source type: education. Supports: the fundamental kinematic principles demonstrating how link-arm length and pivot-pin positions interact to define the door's path, opening angle, and clearance characteristics in a multi-link hinge system. ↩
"Multi-Link Hinges - Learning and Intelligent Systems Group - MIT", https://lis.csail.mit.edu/multilinkHinge/. This source elaborates on the specific kinematic roles of arm length in determining the travel range and lateral shift of a door, and pivot-pin position in influencing the curvature of its movement path within a concealed hinge system. Evidence role: mechanism; source type: education. Supports: the specific kinematic effects of arm length on the range and lateral shift of door movement, and the impact of pivot-pin position on the curvature of the movement path in concealed hinges. ↩
"Concealed Hinges 101 - YouTube",
. This source outlines industry best practices and technical considerations for concealed hinge installation, emphasizing the necessity of matching hinge dimensions with door thickness, mortise depth, and available frame space for correct embedding. Evidence role: expert_consensus; source type: institution. Supports: the critical importance of door thickness, mortise depth, hinge body dimensions, and frame space for the proper and secure embedding of concealed hinges. ↩"Mortise depth vs tenon thinkness", https://sawmillcreek.org/threads/mortise-depth-vs-tenon-thinkness.285927/. This source discusses the structural considerations for mortising, indicating that mortises which are too deep or too close to the material edge can significantly reduce the fixing strength and overall integrity of the door or frame. Evidence role: expert_consensus; source type: education. Supports: the structural implications of mortise dimensions and placement, specifically how excessive depth or proximity to the edge can weaken the door or frame material and compromise fixing strength. ↩
"Manufacturing Tolerances for Standard Steel Doors & Frames | SDI", https://steeldoor.org/SDI-117/. This source highlights the common presence of manufacturing tolerances in door and frame production, explaining how 3D adjustment capabilities in concealed hinges are a practical solution to achieve precise alignment during installation. Evidence role: expert_consensus; source type: institution. Supports: the industry recognition of manufacturing tolerances in doors and frames, and how 3D adjustment features in concealed hinges address these variations for proper installation and alignment. ↩
"Door closer - Wikipedia", https://en.wikipedia.org/wiki/Door_closer. This source clarifies the separate functions within a concealed hinge, distinguishing the linkage geometry's role in guiding the door's path from the hydraulic or spring mechanism's role in controlling closing speed and absorbing energy. Evidence role: mechanism; source type: education. Supports: the distinct functional roles of linkage geometry (kinematic control) and hydraulic/spring mechanisms (damping and energy absorption) within advanced concealed hinge systems. ↩
