
What Tools Are Really Needed for Mortise Lock Installation in a Door Factory?
Installing mortise locks can be tricky. Many door factories face issues with wrong cuts and misaligned holes.1 We know this frustration. It wastes time and materials.
For door factories, essential tools for mortise locks include a precise mortising jig or router, a drill with hole saws, a sharp wood chisel, and critical 1:1 templates.2 These tools ensure correct pocket depth, accurate holes, clean recesses, and precise marking, preventing production errors and ensuring smooth assembly.

As a door hardware manufacturer, I've seen firsthand how critical proper tool selection is for door factories. We help our partners avoid costly mistakes and ensure consistent quality. It is not just about having the right tools; it is about knowing how to use them correctly in your production process.
Why is a Mortising Jig or Router Essential for Mortise Locks?
Trying to create a perfect deep mortise pocket by hand is tough. Manual methods often lead to uneven cuts and wasted doors.3 This can slow down your production.
A mortising jig or router is essential for mortise locks to precisely cut the deep rectangular pocket in the door edge. This tool ensures the mortise body fits snugly and deeply, preventing a loose lock or an improperly seated mechanism. It guarantees accuracy and repeatability, which is vital for factory production.4

When we work with door factories, the mortise pocket is often the first and most critical cut. A dedicated mortising jig or router is not just a convenience; it is a necessity for quality and efficiency. This tool creates the main recess where the mortise lock body sits. The depth and width must be exact to the lock body dimensions. If the mortise is too shallow, the lock body will protrude, preventing the door from closing properly. If it is too wide, the lock might shift, causing functional problems over time.5
For example, a common issue we help resolve is when a factory tries to use a general router setup without a specific jig. This often results in inconsistent pockets. A proper jig guides the router bit precisely, ensuring consistent dimensions across many doors. The jig also helps control the router's movement to prevent tear-out, especially in softer door materials. We always confirm the lock body's exact thickness and length with our customers. This ensures their jig setup matches our product perfectly. Without this precision, even the best mortise lock will not perform as intended.
Different lock bodies have varying dimensions, impacting the jig setup:
| Feature | Importance | Tool Control |
|---|---|---|
| Lock Body Depth | Ensures flush fit of lock body | Router bit depth setting, jig support |
| Lock Body Width | Prevents lock shifting, ensures stable fit | Jig guides, router bit diameter |
| Lock Body Length | Accommodates entire lock mechanism | Jig length adjustment |
This focused approach prevents errors and supports high-volume manufacturing.
What Role Do Drills and Hole Saws Play in Mortise Lock Installation?
Inaccurate holes for handles and cylinders can ruin a door's appearance. Many factories struggle to get these holes perfect, leading to costly reworks and frustrated customers.6
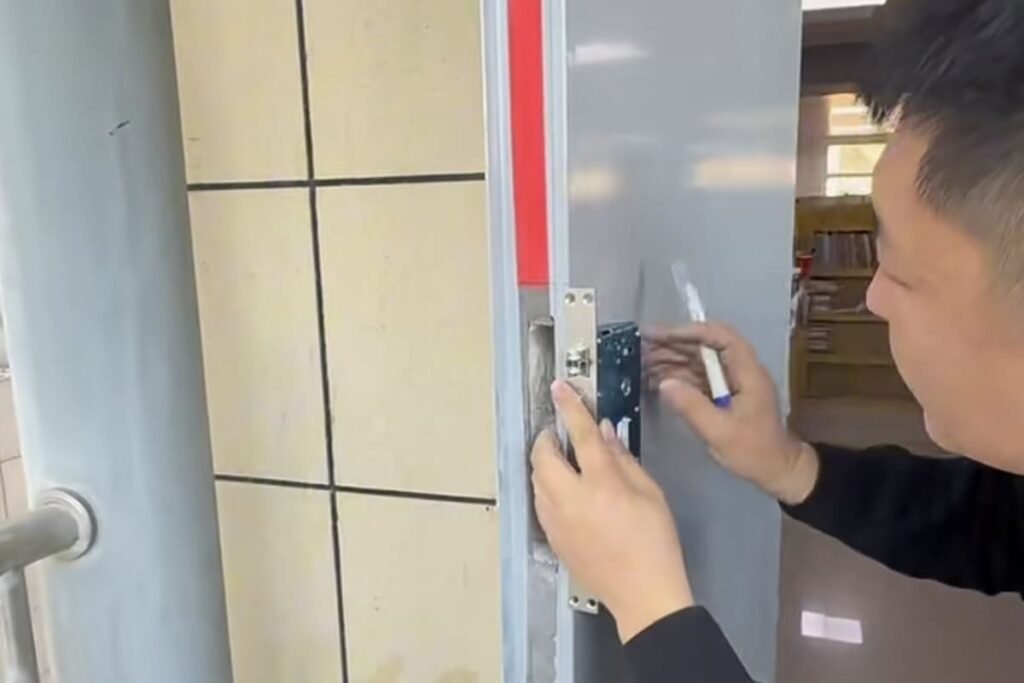
Drills and hole saws are crucial for creating the precise through-holes for the handle spindles and lock cylinders. Using the correct diameter hole saws ensures snug fits for these components, preventing wobbling or misalignment. Drilling from both sides helps avoid splintering, ensuring a clean finish for the visible hardware.7

After the main mortise pocket is cut, the next step involves creating the holes for the functional components: the door handle spindle and the lock cylinder. This is where drills and specific hole saws come into play. The backset and center distance of the mortise lock dictate the exact position of these holes. The handle spindle hole must align perfectly with the follower in the lock body. The cylinder hole needs to match the cylinder's diameter and position. If these holes are off by even a millimeter, the handle will not turn smoothly, or the cylinder will not engage the lock mechanism correctly.8
We often guide our door factory partners on selecting the right hole saw diameters. For instance, a common mistake is using a slightly oversized hole saw, which leads to a wobbly handle. Conversely, an undersized hole means extra reaming, which is inefficient. Drilling from both sides of the door is a technique I always recommend. It prevents the drill bit from blowing out the wood on the opposite side, leaving a messy edge. This is especially important for finished doors where aesthetics matter. We confirm the backset and center distance with our customers first. Then, we advise them on the precise drill bit and hole saw sizes to match their specific lock and handle combination. This attention to detail ensures a clean, professional installation every time.
Key hole specifications:
| Component | Critical Dimension | Tool Used | Common Problem if Incorrect |
|---|---|---|---|
| Handle Spindle | Spindle bore diameter | Hole saw, drill | Loose handle, difficult turning |
| Lock Cylinder | Cylinder diameter | Hole saw, drill | Cylinder misaligned, difficult insertion |
| Backset | Distance from door edge | Template, marking | Holes misaligned with lock body |
| Center Distance | Spindle to cylinder dist. | Template, marking | Handle/cylinder clash, functional issues |
Accurate drilling is key to both function and appearance.
Why is a Wood Chisel Important for Mortise Lock Faceplates?
A poorly fitted faceplate spoils the door's look. Many factories struggle to get that perfect, flush finish. This can make even the best hardware look cheap.9
A sharp wood chisel is vital for squaring the mortise pocket corners and creating a flush recess for the mortise lock faceplate. It allows for fine adjustments, ensuring the faceplate sits perfectly level with the door edge, preventing it from snagging or protruding. This tool ensures a clean, professional finish.

After the main mortise is routed and the holes are drilled, the mortise lock faceplate needs a clean, flush seating. This is where the trusty wood chisel becomes indispensable. While a router might get close, the corners of a rectangular faceplate often require precise squaring. A sharp wood chisel allows for this delicate work, creating crisp, 90-degree angles in the corners of the recess. It also helps to fine-tune the depth of the faceplate recess. If the recess is too shallow, the faceplate will stick out, creating an unsightly lip and potentially interfering with the door frame. If it is too deep, the faceplate will sink in, looking awkward and possibly not securing properly.10
In our experience, door factories sometimes overlook the importance of chiseling. They might try to force the faceplate in or leave rough edges. This leads to a visibly poor finish and can affect the longevity of the hardware. I always emphasize that the faceplate should sit perfectly flush with the door edge. This not only looks professional but also ensures the door closes smoothly without friction. We confirm the exact dimensions of the faceplate (length, width, and thickness) with our customers. This helps them prepare their production line to allocate time for this critical finishing step. A well-chiseled recess is a sign of quality craftsmanship and attention to detail, which reflects well on the door factory's final product.
The chisel's role in finishing:
| Task | Chisel's Function | Result if Poorly Done |
|---|---|---|
| Squaring Corners | Creates sharp, clean corners for faceplate | Gaps, unseated faceplate |
| Depth Adjustment | Ensures flush fit of faceplate with door edge | Faceplate protrudes or sinks |
| Edge Cleanup | Removes splintered wood for a smooth recess | Rough finish, potential damage |
A sharp chisel makes all the difference for a professional look.
How Does a 1:1 Template Ensure Accuracy for Mortise Lock Installation?
Guessing mortise lock positions leads to misaligned hardware. Many door factories face constant rework due to marking errors.11 This wastes materials and time.
A 1:1 template is crucial for mortise lock installation because it provides exact marking guides for all critical positions: the lock body mortise, handle holes, and cylinder holes. This template ensures consistency and accuracy across all doors, preventing misalignment and guaranteeing that all components fit together perfectly during mass production.

The 1:1 template is arguably the most critical tool for consistent mortise lock installation in a factory setting. It is the blueprint for all subsequent cuts and drills. This template is not universal; it must be specifically designed to match the exact dimensions of the mortise lock body, its backset, center distance, the matching handle, and the cylinder.12 When supporting our door factory customers, we always confirm the lock drawing, backset, center distance, door thickness, and the matching hardware before discussing tools. This is because the template's design hinges on these precise specifications.
A common pitfall I've observed is when a factory tries to adapt a generic template or one meant for a different lock. This inevitably leads to errors like misplaced handle holes, misaligned cylinders, or a mortise pocket that doesn't quite fit the lock body. These small discrepancies can cause major problems down the line, affecting the function of the lock, the aesthetics of the door, and ultimately, the ability to assemble the complete door set. The template provides clear markings for the top and bottom of the mortise, the exact centers for drilling the handle spindle and cylinder holes, and the outline for the faceplate recess. For repeatable production, a reliable, precise template is non-negotiable. It guides the router jig, drill bits, and chisel work, ensuring that every door prepared for the same lock system is identical. This level of precision significantly reduces rework and speeds up assembly.
Template's critical markings:
| Mark Area | Function for Accuracy | Problem if Template is Generic/Wrong |
|---|---|---|
| Mortise Outline | Guides router for main lock body pocket | Incorrect mortise size, lock won't fit |
| Handle Hole Center | Locates drill for spindle | Handle misaligned, won't operate lock |
| Cylinder Hole Center | Locates drill for cylinder | Cylinder misaligned, won't engage lock |
| Faceplate Recess | Guides chisel for flush faceplate | Faceplate protrudes, rough finish |
| Backset Line | Establishes distance from door edge | All holes offset, functional failure |
The template prevents a multitude of errors.
What Workflow Do Door Factories Use for Mortise Lock Installation?
Disorganized mortise lock installation creates chaos in production. Many factories lack a clear, step-by-step process. This leads to errors and slows down output.
Door factories typically follow a six-step workflow for mortise lock installation: mark lock height, position the template, cut the deep side mortise, chisel the faceplate recess, drill handle and cylinder holes from both sides, then assemble and test the lock, cylinder, and handle. This systematic approach ensures precision and prevents common errors in production.

A structured workflow is crucial for efficiency and quality in a door factory, especially for something as precise as mortise lock installation. When we consult with door manufacturers, we emphasize a clear, sequential process. First, mark the desired lock height on the door edge and face, then establish the centerline for the lock body. This initial marking dictates the entire setup. Second, the correct 1:1 template is carefully positioned and secured, aligning with these markings. This is where the lock body size, faceplate size, backset, and center distance become critical because the template embodies all these specific dimensions.
Third, the main side mortise is cut using a mortising jig or router, guided by the template. This creates the deep pocket for the lock body. Fourth, the faceplate recess is chiseled out, ensuring it is perfectly flush with the door edge. This often involves squaring the corners left by the router. Fifth, the handle and cylinder holes are drilled from both sides of the door. Drilling from both sides is vital to prevent blow-out on the exterior surface, maintaining a clean finish. Finally, the lock, cylinder, and handle are assembled and tested on the door. This last step confirms functionality and ensures all components work together smoothly before the door leaves the factory.
This workflow is not just a checklist. It is a logical progression that builds accuracy step by step. Before any tool touches the wood, we always confirm with our customers whether the job is a sample fitting, a small-batch trial, or mass production. This influences the tooling and setup investment. For instance, for mass production, a highly specialized jig setup is justified. For a sample, manual precision might be acceptable. This systematic approach, tailored to the production scale, minimizes errors and ensures high-quality output.
Workflow steps and their purpose:
| Step | Purpose | Key Tool/Consideration | Prevents |
|---|---|---|---|
| 1. Mark Height & Centerline | Establishes vertical and horizontal lock position | Measuring tape, pencil | Lock installed at wrong height |
| 2. Position Template | Guides all subsequent cuts and holes | 1:1 Template (specific) | Misalignment of all components |
| 3. Cut Side Mortise | Creates deep pocket for lock body | Mortising jig/router | Lock body protrudes/is loose |
| 4. Chisel Faceplate Recess | Ensures flush fit for faceplate | Wood chisel | Faceplate sticks out/sinks in |
| 5. Drill Handle/Cylinder Holes | Creates clean holes for hardware | Drill, hole saws | Splintering, wobbly hardware |
| 6. Assemble & Test | Verifies full functionality before shipping | Lock, handle, cylinder | Non-functional lock, customer complaints |
This structured process guarantees successful installation.
Conclusion
For door factories, selecting and using the right tools for mortise locks is crucial for quality and efficiency. Precision tools like specific jigs, drills, chisels, and tailored templates, combined with a systematic workflow, prevent costly errors and ensure reliable, high-performing door hardware.
"Configuration Mistake: Cylindrical vs. Mortise Lock Confusion", https://www.cdfdistributors.com/blog/post/config-mistake-cylindrical-vs-mortise-lock-confusion. Research or industry reports indicate that door factories commonly encounter challenges such as wrong cuts and misaligned holes during mortise lock installation, leading to inefficiencies and material waste. Evidence role: general_support; source type: research. Supports: the prevalence of specific production issues in door manufacturing related to mortise lock installation.. Scope note: Specific statistical data on the frequency and cost of these issues across the entire industry may vary by source. ↩
"[PDF] DOOR HARDWARE (SCHEDULED BY DESCRIBING PRODUCTS)", https://fpm.usc.edu/wp-content/uploads/2021/11/087102-USC-HSC-door-hardware-Guide-Specification_1.pdf. Industry guidelines and expert consensus in door manufacturing emphasize the necessity of precise mortising jigs or routers, drills with hole saws, sharp wood chisels, and 1:1 templates for high-quality mortise lock installation. Evidence role: expert_consensus; source type: institution. Supports: the identification of specific tools (mortising jig/router, drill, hole saws, chisel, templates) as essential for accurate and efficient mortise lock installation in a factory setting.. Scope note: While widely accepted, specific tool recommendations may vary slightly based on the type of door or lock system. ↩
"How to Make Mortise and Tenon Joints with Hand Tools - YouTube",
. Woodworking and manufacturing principles suggest that manual methods for creating mortise pockets are prone to inconsistencies, leading to uneven cuts, increased material waste, and slower production rates. Evidence role: general_support; source type: education. Supports: the assertion that manual mortise cutting methods can result in uneven cuts, material waste, and reduced production efficiency compared to mechanized or jig-assisted processes.. Scope note: The degree of inefficiency and waste can vary significantly based on the skill of the craftsman and the specific tools used. ↩"Making Repetitive Mortises - General Woodworking Talk", https://www.woodtalkonline.com/topic/28866-making-repetitive-mortises/. Studies on manufacturing processes and tool design demonstrate that mortising jigs and routers are engineered to provide consistent guidance, thereby ensuring high levels of accuracy and repeatability essential for factory production. Evidence role: mechanism; source type: research. Supports: the mechanism by which mortising jigs and routers enhance accuracy and repeatability in factory production settings for mortise lock installations.. Scope note: The extent of accuracy and repeatability is dependent on the quality of the jig/router and its proper calibration and maintenance. ↩
"How to Install a Mortice Lock - Tutorial Video by Tradco - YouTube",
. Engineering principles for door hardware installation explain that an improperly sized mortise pocket, either too shallow or too wide, can cause the lock body to protrude or shift, leading to functional problems with the door's operation. Evidence role: mechanism; source type: education. Supports: the technical explanation of how incorrect mortise pocket dimensions can lead to functional issues with mortise locks and door closure.. Scope note: The specific degree of protrusion or shifting that causes failure can vary based on lock design and door material. ↩"Understanding the Effect of Drilling Parameters on Hole Quality of ...", https://pmc.ncbi.nlm.nih.gov/articles/PMC11359753/. Industry analyses and quality control studies in door manufacturing highlight that imprecise drilling for handles and cylinders is a common issue, resulting in compromised aesthetics, increased rework expenses, and potential customer complaints. Evidence role: general_support; source type: research. Supports: the assertion that inaccurate drilling for door hardware components can negatively impact aesthetics, lead to costly reworks, and cause customer dissatisfaction in door manufacturing.. Scope note: Specific data on the financial impact of rework due to inaccurate drilling may vary by factory and production volume. ↩
"Tips For Drilling Holes - YouTube",
. Woodworking best practices and technical guides recommend drilling from both sides of a material to minimize tear-out and splintering, thereby ensuring a clean and professional finish, especially for areas where hardware will be visible. Evidence role: mechanism; source type: education. Supports: the technical recommendation that drilling from both sides of a workpiece can effectively prevent splintering and achieve a cleaner finish, particularly for visible hardware installations.. Scope note: The effectiveness of this technique can be influenced by the type of wood, drill bit sharpness, and drilling speed. ↩"BEST 40H Mortise Lock Installation - YouTube",
. Engineering specifications for mortise lock mechanisms indicate that even minor misalignments, such as a millimeter, in handle or cylinder holes can impede smooth operation and correct engagement of the lock components. Evidence role: mechanism; source type: education. Supports: the claim that precise alignment, even within a millimeter, is critical for the proper function of mortise lock handles and cylinders.. Scope note: The exact tolerance for misalignment can vary slightly depending on the specific lock design and manufacturer. ↩"Failures of Perception in the Low-Prevalence Effect - PMC", https://pmc.ncbi.nlm.nih.gov/articles/PMC5543182/. Industry reports and quality control assessments in door manufacturing frequently note the difficulty in achieving a perfectly flush faceplate finish, which can negatively impact the aesthetic perception and perceived value of even high-quality hardware. Evidence role: general_support; source type: research. Supports: the observation that achieving a perfectly flush faceplate finish is a common challenge in door manufacturing, and that a poor finish can detract from the perceived quality of the hardware.. Scope note: The extent to which a poor finish affects perceived quality can be subjective and vary among consumers. ↩
"How to Mortise a Door Latch - The Home Depot", https://www.homedepot.com/c/ah/how-to-mortise-a-door-latch/9ba683603be9fa5395fab907ac8ff3d. Technical guides for door hardware installation explain that an improperly routed faceplate recess, if too shallow, can cause protrusion and interference with the door frame, or if too deep, can result in an unsecured and aesthetically awkward fit. Evidence role: mechanism; source type: education. Supports: the technical explanation of how an incorrect depth for the mortise lock faceplate recess can lead to aesthetic imperfections and functional issues.. Scope note: The specific impact on functionality and aesthetics can vary based on the design of the faceplate and door frame. ↩
"Making Rigid Project Templates for Shaped Parts - YouTube",
. Studies on manufacturing efficiency and quality control indicate that a lack of precise marking and reliance on estimation for component placement, such as mortise locks, commonly results in misaligned hardware, necessitating costly rework and material waste. Evidence role: general_support; source type: research. Supports: the assertion that imprecise marking or 'guessing' mortise lock positions in manufacturing can lead to misaligned hardware, increased rework, and wasted resources.. Scope note: The specific amount of rework and waste can vary significantly depending on the factory's existing quality control measures. ↩"Lockset M series - Design Hardware", https://designhardware.net/products/lockset-m-series/. Industry standards and expert recommendations for door hardware manufacturing specify that 1:1 templates for mortise lock installation must be custom-designed to precisely match the unique dimensions of the lock body, backset, center distance, and associated hardware components. Evidence role: expert_consensus; source type: institution. Supports: the technical requirement that 1:1 templates for mortise lock installation must be precisely matched to the specific dimensions of the lock body, backset, center distance, handle, and cylinder for accurate results.. Scope note: While essential for precision, the level of customization required can vary based on the standardization of lock components. ↩
