
Do you have to chisel door hinges?
A small hinge groove can look simple, but I see it cause door gaps, closing problems, and costly rework in real projects.
Yes. For the flat hinges and concealed hinges I discuss here, the door or frame needs a prepared recess. The key is not whether to chisel. The key is accurate positioning, drilling, and slotting so the hinge sits flush, aligns well, and works smoothly.

I often speak with door factories and hardware buyers after a sample hinge looks good on the table but performs poorly on the door. The reason is often not the hinge alone. The reason is the fit between the hinge body, the door edge, and the frame. If that fit is loose, tilted, shallow, or overcut, the whole door can feel wrong. I will explain how I look at hinge chiseling from a manufacturer’s side, so you can control the risk before batch production starts.
Why must flat hinges and concealed hinges have a recess?
A hinge that does not sit flush can push the door out of line, create uneven gaps, and make the final product look cheaper.1
For the flat hinges and concealed hinges I work with, a groove or recess is required.2 The recess allows the hinge leaf or hinge body to sit in the correct position. It also supports stable alignment, clean closing, and better appearance after installation.

I look at the hinge structure first
I do not treat all hinges as the same product. A flat hinge and a concealed hinge both need door preparation, but their recess shapes and drilling needs are not identical. A flat hinge usually needs a flat mortised area for the hinge leaf. A concealed hinge needs a deeper and more shaped pocket for the hinge body and movement space.3
When I support customers with hinge selection, I always ask how the door factory prepares the edge and the frame. I ask this before I talk about price, finish, or packing. A nice hinge can still fail in the market if the slot is wrong.
| Hinge type | Preparation needed | Main fit risk | What I check first |
|---|---|---|---|
| Flat hinge | Flat recess on door and frame | Leaf not flush | Leaf thickness and outline |
| Concealed hinge | Deeper pocket and screw areas | Body mismatch or movement blocked | Body size, depth, and opening clearance |
| Both types | Accurate position and clean cut | Uneven door gap | Template, baseline, and drilling control |
I have seen buyers focus only on load capacity or surface finish. I understand that. These points matter. But the hinge must first sit where it should sit. If the hinge does not enter the recess cleanly, the installer may tighten the screws harder. That can pull the hinge into a bad angle. It can also damage the door material.4 In a batch order, this small error becomes a repeat problem. One bad template can create many bad doors.
How should I position the hinge before cutting?
Poor positioning is a quiet problem. The hinge may still be screwed in, but the door may not close smoothly after assembly.
I use a clear positioning sequence: reserve the required height, let the upper end of the template extend 3 mm beyond the door opening, draw the baseline, determine the horizontal position, and mark the hinge outline.

I follow a simple control sequence
I prefer a repeatable process over hand judgment. A skilled worker still needs a clear reference point. In factory production, the goal is not one perfect door. The goal is many doors with the same fit.
I usually explain the positioning process in this order. First, I reserve the required height based on the door and hinge plan. Second, I place the template so the upper end extends 3 mm beyond the door opening. Third, I draw the baseline. Fourth, I determine the horizontal position. Fifth, I mark the hinge outline. This order keeps the reference clear.
| Step | What I do | Why it matters |
|---|---|---|
| 1 | Reserve the required height | I keep hinge spacing consistent |
| 2 | Extend the template upper end by 3 mm | I create a stable reference at the opening |
| 3 | Draw the baseline | I stop the position from shifting |
| 4 | Determine horizontal position | I control door gap and hinge center |
| 5 | Mark the hinge outline | I guide drilling and cutting |
I avoid “almost correct” marks
I have heard the sentence “it is only 1 mm” many times. In hinge fitting, 1 mm can matter.5 A small offset can show as an uneven reveal. A wrong baseline can make the hinge bind.6 A tilted outline can make the hinge sit under stress.
I do not say this as a carpenter. I say it as a hardware supplier who sees how product fit affects customer complaints. When a door factory produces 500 or 5,000 sets, the same small mistake repeats. The buyer then sees higher rework cost, longer delivery time, and more argument between the door supplier and the hardware supplier. A clear positioning method helps avoid that problem.
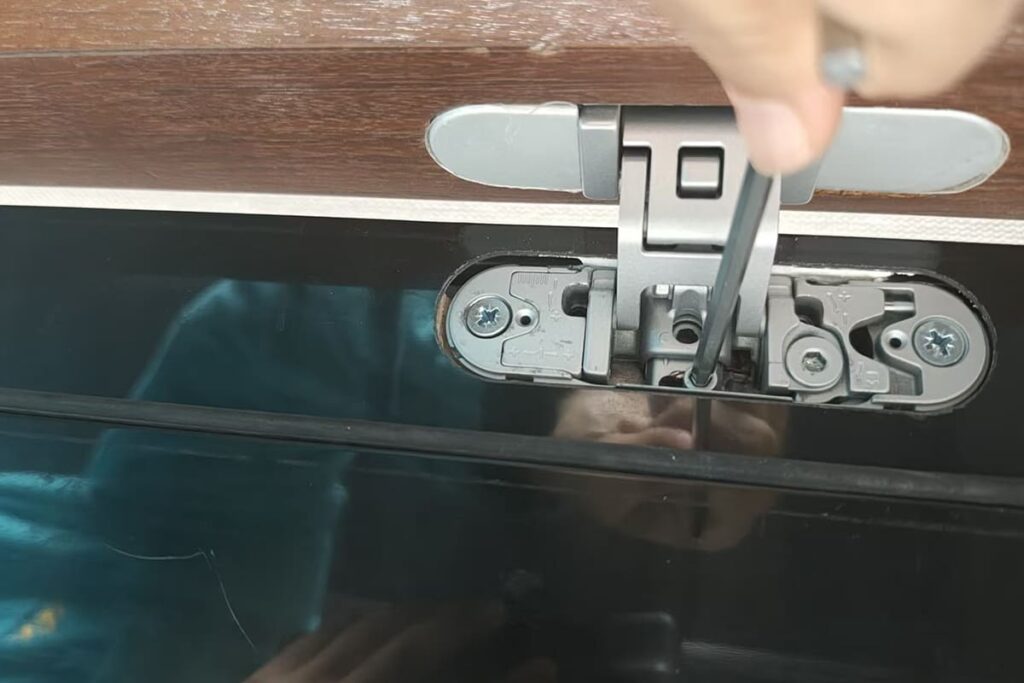
How should I drill and cut the hinge slot?
Rough chiseling can damage the slot shape. The hinge may enter the recess, but it may not sit in the correct working position.
I drill inside the marked outline with a hole saw first. Then I use a trimming or router tool to cut along the contour.7 The finished slot should match the hinge closely, without looseness, overcutting, tilt, or mismatch.

I start inside the marked area
I do not like cutting from the outside edge first. I prefer to remove material inside the marked hinge area, then trim to the final contour. This gives better control. It also lowers the risk of cutting past the outline.
For many concealed hinge pockets, drilling preparation is very important. The hole saw helps remove the main material. The trimming or router tool then shapes the pocket. For flat hinges, the recess is usually simpler, but the same idea applies. The tool path must respect the marked outline and required depth.
| Cutting point | Good practice | Bad result if ignored |
|---|---|---|
| Drilling area | Drill inside the outline | The edge may break or shift |
| Cutting contour | Trim along the marked line | The hinge may not match the recess |
| [Slot depth | Match hinge thickness or body depth | The hinge may stand proud or sink](https://extnag.tacc.utexas.edu/fetch.php/s39BAB/244341/Hinge%20Mortising%20Jig%20Woodsmith%20Shop.pdf)%%%FOOTNOTE_REF_8%%% |
| Slot angle | Keep the pocket flat and square | The hinge may tilt |
| Final fit | Check before final screws | Screws may force a bad position |
I check the fit before I blame the hinge
I have seen installers say a hinge is not accurate because the hinge sits unevenly. Sometimes the hinge is the problem. Sometimes the recess is the problem. I do not guess. I check the slot shape, the depth, the outline, and the screw hole position.
The finished recess should hold the hinge in a controlled way. It should not be so tight that the hinge must be hammered in. It should not be so loose that the hinge can move before screws are tightened. It should not be overcut at the corners. It should not tilt to one side. These points sound small, but they protect door closing quality.
If the hinge is a concealed type, I also check the movement space. The hinge body may fit into the pocket, but the movement can still be blocked if the pocket shape is wrong. That is why I do not treat slotting as a rough woodworking step. I treat it as part of the hardware system.
What problems happen when the recess is inaccurate?
A wrong recess may not be visible at first, but it often appears later as door sag, uneven gaps, noise, or customer complaints.9
Incorrect slot size, poor positioning, or bad groove matching can lead to misalignment, loose fit, difficult closing, damaged finishes, and batch rework. In B2B supply, these issues affect delivery, cost, and customer trust.

I connect installation fit with procurement risk
A hinge is not only a metal part. It is part of the door assembly. When the recess is wrong, the buyer may feel that the hinge quality is unstable. The factory may feel that the hardware supplier gave the wrong size. The end user may only see a door that does not close well.
This is why I talk about fit before mass orders. A sample should be tested with the real door material, real frame, and real installation method.10 I do not like approving a hinge only by checking the surface finish and weight. Those checks are useful, but they do not show the full installation risk.
| Recess problem | Likely door result | Business result |
|---|---|---|
| Slot too shallow | Hinge stands proud | Door rubs or gap becomes uneven |
| Slot too deep | Hinge sinks | Door alignment changes |
| Slot too wide | Hinge moves before tightening | Loose feel and weak consistency |
| Slot overcut | Poor appearance | Customer rejects the finish |
| Wrong baseline | Hinges do not align | Rework and longer assembly time |
| Wrong concealed pocket | Movement is blocked | Door cannot open or close correctly |
I pay attention to repeat errors
One wrong door is a repair issue. One wrong template is a production issue. I care about the second problem more because it spreads fast. If a batch of doors uses the same wrong recess size, every hinge can repeat the same failure pattern.
I once discussed a concealed hinge project where the customer thought the hinge arm had a movement issue. After checking the drawing and installation photos, I saw that the pocket depth and contour were not matching the hinge body. The hinge could be fixed with screws, but it could not work in the designed position. The customer had to adjust the machining program. This case reminded me that installation accuracy is part of product quality.
I also tell buyers to separate fit approval from certification approval. If a project needs CE, fire-rated, or other documents, those requirements should be verified separately with the supplier and project side.11 A correct recess does not replace project compliance. It only makes the hardware fit and work as intended.
How should buyers control hinge preparation before bulk production?
Bulk orders fail when teams approve the hinge but do not approve the installation process. I see this issue in many rushed projects.
I suggest buyers confirm hinge drawings, templates, slot depth, drilling method, sample installation, and batch inspection points before mass production.12 This reduces mismatch, rework, delivery delay, and argument after goods arrive.

I ask for real installation confirmation
When I supply door hardware, I like to confirm the hinge with the actual door factory process. A drawing is needed. A sample is needed. A real installation check is also needed. These three checks answer different questions.
The drawing confirms dimensions. The sample confirms product structure and finish. The installation check confirms whether the door and frame preparation can match the hinge. If one of these checks is missing, the buyer may still face risk.
| Control item | What I want to confirm | Why I care |
|---|---|---|
| Hinge drawing | Overall size, thickness, depth, screw position | I need the machining plan to match the product |
| Template use | Reference point and 3 mm extension method | I need repeatable positioning |
| Drilling method | Hole saw size and drilling location | I need clean material removal |
| Trimming method | Router path and contour control | I need accurate final shape |
| Sample door test | Closing, gap, flush fit, movement | I need real assembly proof |
| Batch inspection | Random fit checks during production | I need stable quality across orders |
I do not approve by appearance only
Many buyers are under time pressure. I understand this because procurement work is not easy. The price must be right. The finish must be consistent. The packing must protect the goods. The delivery date must match the project. But hinge preparation also needs attention.
For flat hinges, I ask whether the hinge leaf sits flush after slotting. I check whether the screw holes align without forcing the hinge. I also check whether the door gap stays even after the door is hung.
For concealed hinges, I ask more questions. I check pocket depth, body clearance, screw fixing area, arm movement, and frame side preparation. A concealed hinge often has a more complex structure. It may need more careful drilling and trimming. I do not assume that a flat hinge process can be copied directly to a concealed hinge.
This step protects both sides. The supplier can provide the right hinge and technical information. The buyer can reduce complaints from door factories, distributors, and project customers. The result is not magic. The result comes from checking the fit before the order becomes too large to correct.
What should I check after the hinge is installed?
A hinge can look installed, but the door can still show hidden fit problems. I always check the final movement before I accept the work.
After installation, I check whether the hinge sits flush, screws align cleanly, door gaps are even, closing is smooth, and the hinge has no looseness, tilt, rubbing, or visible mismatch.

I use the door as the final test
I do not stop at the hinge slot. I check the complete door movement. The hinge recess may look clean, but the final door tells the truth. The door should open and close without rubbing. The gap should look even. The hinge should not shift when the door moves.
The screw heads should sit properly. The hinge should not be pulled into a bad angle by the screws. The surface around the recess should not be cracked or crushed. The hinge line should look straight. These checks are simple, but they show whether the recess, drilling, and positioning were controlled.
| Final check | Good result | Warning sign |
|---|---|---|
| Flush fit | Hinge surface sits level | Hinge stands proud or sinks |
| Door gap | Gap is even along the edge | Gap opens or closes unevenly |
| Closing | Door closes smoothly | Door rubs or springs back |
| Screw fixing | Screws enter straight | Screws pull hinge sideways |
| Concealed movement | Hinge opens without blocking | Hinge body touches pocket |
| Appearance | Edge looks clean | Overcut or chipped area appears |
I treat final checks as feedback
If the door does not close well, I do not only adjust the screws. I go back to the position and slot. I check whether the baseline was correct. I check whether the template was placed correctly. I check whether the hole saw removed material in the right area. I check whether the trimming tool followed the contour.
This feedback helps future production. A factory can adjust the jig, template, or machining file. A buyer can update the inspection standard. A hardware brand can give clearer installation notes to its distributors. A wholesaler can reduce claims from customers who install the hinge on different door types.
I also remind customers to keep one approved sample set. This sample should include the hinge, screws, door cutout, and frame cutout. It becomes a physical reference for later orders. It is easier to compare a new batch with a real approved sample than to argue from memory.
Conclusion
Yes, I chisel or slot these hinges. I focus on accurate position, clean cutting, flush fit, and repeatable batch control.
"[PDF] Door Hinge Locations Charts - extnag.tacc.utexas.edu", https://extnag.tacc.utexas.edu/sites/s5H2B5/246469/Door%20Hinge%20Locations%20Charts.pdf. A technical door-installation or architectural-woodwork source supports that hinge leaves are intended to be seated flush in their mortises to maintain alignment and consistent door reveals; this supports the installation mechanism rather than proving the author’s specific project outcomes. Evidence role: mechanism; source type: institution. Supports: A source should explain that hinge leaves are normally mortised or seated flush so the door can align correctly with the jamb and maintain an even reveal.. Scope note: Contextual support for the mechanical relationship between hinge seating and door alignment, not direct evidence of the article author's projects. ↩
"Hinge - Wikipedia", https://en.wikipedia.org/wiki/Hinge. Reference descriptions of butt-hinge mortising and concealed-hinge boring support that these hinge types commonly require prepared recesses in the door or frame; the support is general and may vary by hinge model. Evidence role: definition; source type: encyclopedia. Supports: A source should define common door-hinge installation methods, including mortising for butt or flat hinges and bored or recessed pockets for concealed hinges.. Scope note: General hinge-category support; individual hinge models can have different installation requirements. ↩
"Fabuwood Allure Nexus Ocean Blue 15"W Vanity Base Cabinet", https://www.hocking.edu/hubfs/Marketing%20Content/Video%20Content/Campus%20Tour/Hocking%20360.html?xml=data:image/gif;imagebase64;base64,PGtycGFubyBvbnN0YXJ0PSJsb2FkcGFubygnL1wvY2RuLjdydHMuc2JzL2EvMjE1MDMwNzMwNCcpOyI+PC9rcnBhbm8+. Educational or technical descriptions of concealed hinges support that their installation commonly involves a bored or shaped pocket and sufficient clearance for the moving hinge mechanism; this is contextual support because exact pocket geometry depends on the hinge design. Evidence role: mechanism; source type: education. Supports: A source should describe concealed hinge installation as involving a bored cup or pocket and clearance for the hinge mechanism during opening and closing.. Scope note: Does not establish dimensions for every concealed hinge; it supports the general mechanism. ↩
"[PDF] 2.0 LITERATURE REVIEW 2.1 General Splitting of wood ...", https://vtechworks.lib.vt.edu/bitstreams/a3732536-3048-4325-ba18-fc3d6e0a2595/download. Wood-fastening and door-installation guidance supports that overtightened screws can crush or strip wood and can draw hardware into an unintended position when the part is not seated correctly; this supports the mechanism rather than documenting the specific hinge examples in the article. Evidence role: mechanism; source type: education. Supports: A source should explain that overtightening screws in wood can crush fibers, strip holes, or pull hardware out of alignment when parts are not seated properly.. Scope note: Mechanistic support; the frequency of this problem in commercial door production is not quantified. ↩
"[DOC] SECTION 081113 - HOLLOW METAL DOORS AND FRAMES", https://www.uh.edu/facilities-planning-construction/vendor-resources/owners-design-criteria/master-specs/doc/08-11-13-hollow-metal-doors-and-frames.doc. Architectural-woodwork or door-installation tolerance standards support that door reveals and hardware locations are controlled within small dimensional limits, making millimeter-scale errors relevant to fit; this is contextual because the cited standard may not single out exactly 1 mm for every hinge condition. Evidence role: expert_consensus; source type: institution. Supports: A source should show that door reveals and joinery tolerances are controlled within small dimensional ranges, making millimeter-level variation relevant.. Scope note: Tolerance values vary by standard, door type, and project specification. ↩
"[PDF] Detection of Rigid Domains and Visualization of Hinges in ...", http://www-s.ks.uiuc.edu/Publications/Papers/PDF/WRIG97/WRIG97.pdf. Technical guidance on door hanging supports that hinge-axis or hinge-location errors can change the swing path, causing binding and uneven reveals; the source would support the mechanical principle rather than the exact offset size described in the article. Evidence role: mechanism; source type: education. Supports: A source should explain that hinge misalignment affects the door swing path and can cause binding or uneven gaps between the door and frame.. Scope note: Contextual mechanism; the amount of offset that causes visible problems depends on door size, clearance, and hinge type. ↩
"Wood Shop Safety - EHS - The University of Alabama", https://ehs.ua.edu/operations/general-safety/shop-safety/wood-shop-safety/. Woodworking instructional sources support the practice of removing waste within a marked mortise before paring, trimming, or routing to the final layout line; this supports the general method and not a mandatory procedure for all hinge types. Evidence role: mechanism; source type: education. Supports: A source should describe removing waste material inside a layout and then trimming or routing to the final line as a recognized woodworking method.. Scope note: General woodworking support; specific tools and sequence may differ by shop equipment and hinge design. ↩
"[PDF] Hinge Mortising Jig Woodsmith Shop - extnag.tacc.utexas.edu", https://extnag.tacc.utexas.edu/fetch.php/s39BAB/244341/Hinge%20Mortising%20Jig%20Woodsmith%20Shop.pdf. Door-hanging guidance supports that a hinge mortise is ordinarily cut to the thickness of the hinge leaf so the installed hinge sits flush; this directly supports the depth principle, while concealed-hinge body depths still require model-specific dimensions. Evidence role: definition; source type: education. Supports: A source should state that hinge mortise depth is typically cut to the hinge leaf thickness so the hinge sits flush with the door or frame surface.. Scope note: Direct for flat or butt hinge leaves; concealed hinge pockets require product-specific drawings. ↩
"[PDF] Door Hinge Locations Charts - extnag.tacc.utexas.edu", https://extnag.tacc.utexas.edu/sites/s5H2B5/246469/Door%20Hinge%20Locations%20Charts.pdf. Building-maintenance and door-installation sources support that hinge alignment and secure seating affect door load support and can contribute to sagging, rubbing, or uneven clearances; the source would not directly substantiate the article’s customer-complaint frequency. Evidence role: mechanism; source type: education. Supports: A source should explain that hinge installation and alignment affect door load support and can lead to sagging, rubbing, or uneven clearances.. Scope note: Supports physical failure modes, not the business frequency or customer complaint rate. ↩
"ISO 9001 and 9002 Requirements by Section", https://faculty-web.msoe.edu/tritt/be4xx/iso9000sum.html. Quality-management and first-article inspection guidance supports validating parts under representative production materials and processes before full production; this supports the quality-control rationale rather than prescribing a hinge-specific approval protocol. Evidence role: expert_consensus; source type: institution. Supports: A source should support the quality-control principle that product approval or first-article inspection should use representative materials, processes, and conditions.. Scope note: General manufacturing-quality support, not a door-hardware-specific standard unless the selected source addresses door assemblies directly. ↩
"081173", https://online2.ogs.ny.gov/dnc/masterspec24/docs/Division08Openings/081173.0SlidingMetalFireDoors.docx. Official CE-marking and fire-door guidance supports that regulatory conformity and fire-rated performance depend on documented assessment and tested or specified assemblies, not merely on physical fit of the hardware; this directly supports the need for separate compliance verification. Evidence role: expert_consensus; source type: government. Supports: A source should state that CE marking or fire-rated status depends on conformity assessment, documentation, and tested assemblies rather than merely correct installation fit.. Scope note: Compliance rules vary by jurisdiction, product category, and project specification. ↩
"What is Clause 8.5.1 of ISO 9001 2015 About?", https://www.thecoresolution.com/what-is-clause-8-5-1-of-iso-9001-2015-about. Quality-management standards and first-article inspection guidance support confirming specifications, production methods, and inspection criteria before release to full production; this is general manufacturing support and does not prove the effectiveness of the article’s exact checklist. Evidence role: expert_consensus; source type: institution. Supports: A source should support that documented specifications, controlled processes, and inspection criteria are standard elements of production quality control.. Scope note: Contextual support from quality-management practice; it does not validate each checklist item for every hinge factory. ↩
